How to stitch photos together on Linux
Senin, 30 Desember 2013
0
komentar
http://xmodulo.com/2013/12/stitch-photos-together-linux.html
If you are an avid photographer, you will probably have several stunning panoramic photos in your portfolio. You don't have to be a professional photographer, nor need specialized equipment to create dramatic panoramic pictures. In fact, there are quite a few picture stitch apps (online or offline, desktop or mobile), which can easily create a panoramic view of a scene from two or more overlapping pictures.
In this tutorial, I will explain how to stitch photos together on Linux. For that, I am going to use panoramic photo stitching software called Hugin.
Hugin is an open-source (GPLv2) free panorama photo stitching tool. It is available on multiple platforms including Linux, Windows, OS X, and FreeBSD. Being open-source freeware does not mean that Hugin won't match up to other commercial photo stitchers in terms of features and quality. On the contrary, Hugin is extremely powerful, capable of creating a 360-degree panoramic image, and featuring various advanced photometric corrections and optimizations.


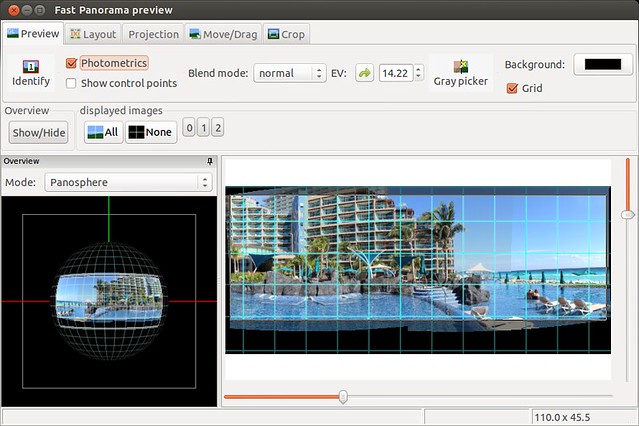
Hugin will then run stitching assistant in a separate window, which analyzes common keypoints (or control points) between photos to combine the photos properly. After analysis is completed, you will see a panorama preview window, which will display panorama preview.

Switch back to the Hugin's main window. Under the "Align" button, you will see the status of photo stitching (i.e., number of control points, mean error). It will also say whether fit is good or bad.

If it says "bad" or "really bad" fit, you can go ahead and fine-tune picture alignment as demonstrated below.

Using the left/right arrow buttons located at the top-center, find a pair of photos which have least common control points. Given such a pair, try adding more common points by hand as follows.
Click one spot on a left-side photo, and then click on the corresponding identical spot on a right-side photo. Hugin will try to fine-tune the match automatically. Click on "Add" button at the bottom to add the matched pair. Repeat this process to add additional common points.


Go back to "Assistant" tab in the main Hugin window, and click on "Align" button again to see if you get a better result.
If the combined panoramic view has a wavy horizon, you can straighten out the horizon. For that, click on "Preview panorama" button in the toolbar.

Then click on "Straighten" button in the Panorama preview window.

Once you are satisfied with the stitch result, you can go ahead, and export it to an image file. For that, go to "Stitcher" tab in the Hugin's main window, and do the following.
Adjust canvas size, and amount of crop. Also, select output format (e.g., TIFF, JPEG, PNG). Finally, click on "Stitch!" button.

You will be asked to save a current project file (*.pto), and then specify output file name for the stitched photo.
It will take a couple of seconds to finalize photo stitch.
Here is the output of my experiment with Hugin. This is a beautiful panoramic view of luxury beach front in Cancun, Mexico. :-)

If you are an avid photographer, you will probably have several stunning panoramic photos in your portfolio. You don't have to be a professional photographer, nor need specialized equipment to create dramatic panoramic pictures. In fact, there are quite a few picture stitch apps (online or offline, desktop or mobile), which can easily create a panoramic view of a scene from two or more overlapping pictures.
In this tutorial, I will explain how to stitch photos together on Linux. For that, I am going to use panoramic photo stitching software called Hugin.
Hugin is an open-source (GPLv2) free panorama photo stitching tool. It is available on multiple platforms including Linux, Windows, OS X, and FreeBSD. Being open-source freeware does not mean that Hugin won't match up to other commercial photo stitchers in terms of features and quality. On the contrary, Hugin is extremely powerful, capable of creating a 360-degree panoramic image, and featuring various advanced photometric corrections and optimizations.
Install Hugin on Linux
To install Hugin on Debian, Ubuntu or Linux Mint:$ sudo apt-get install hugin
To install Hugin on Fedora:$ sudo yum install hugin
Launch Hugin
Use hugin command to launch Hugin.$ hugin
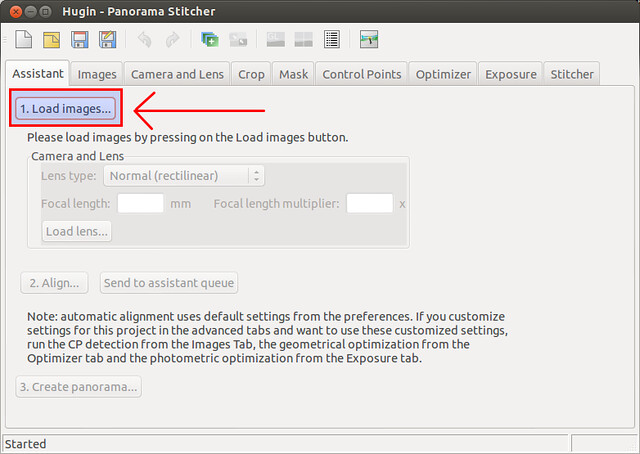
The first thing to do is to load photos that you want to stitch together. For that, click on "Load images" button, and load (two or more) pictures to join. It should be obvious, but individual pictures need to be overlapping with each other.
First Round of Photo Stitching
After loading pictures, click on "Align" button for the first round of stitching.
Hugin will then run stitching assistant in a separate window, which analyzes common keypoints (or control points) between photos to combine the photos properly. After analysis is completed, you will see a panorama preview window, which will display panorama preview.

Switch back to the Hugin's main window. Under the "Align" button, you will see the status of photo stitching (i.e., number of control points, mean error). It will also say whether fit is good or bad.

If it says "bad" or "really bad" fit, you can go ahead and fine-tune picture alignment as demonstrated below.
Add or Remove Control Points
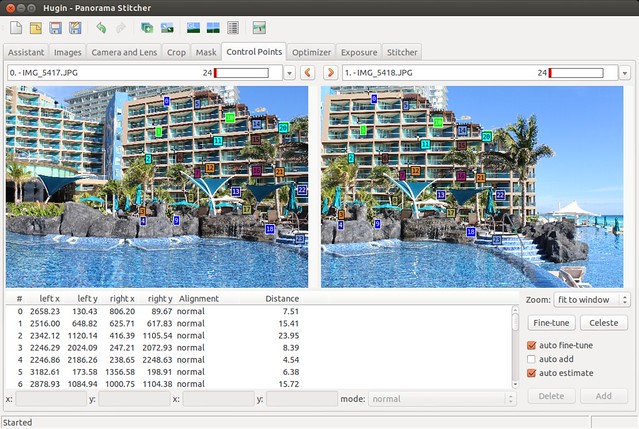
In the main Hugin window, go to "Control Points" tab. In this tab, Hugin shows which common control points are used to join multiple photos. It shows a pair of photos in left/right panels, and common key points between them are visualized with small boxes of the same color. You can remove any spurious points, or add new common points by hand. The more accurately matched points there are, the better quality stitching you will get. Also, if matched control points are well spread-out, they will be more helpful (than highly clustered control points).
Using the left/right arrow buttons located at the top-center, find a pair of photos which have least common control points. Given such a pair, try adding more common points by hand as follows.
Click one spot on a left-side photo, and then click on the corresponding identical spot on a right-side photo. Hugin will try to fine-tune the match automatically. Click on "Add" button at the bottom to add the matched pair. Repeat this process to add additional common points.

Other Optimizations
You can also try re-optimization. Either click on "Re-optimize" button in the toolbar, or go to "Optimizer" tab to fine-tune the optimization.
Go back to "Assistant" tab in the main Hugin window, and click on "Align" button again to see if you get a better result.
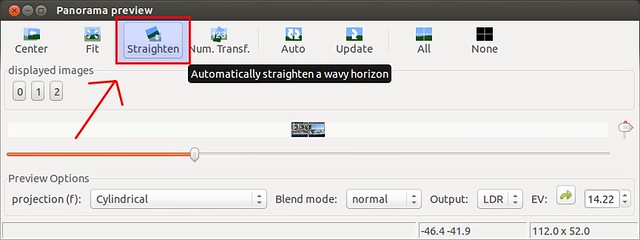
If the combined panoramic view has a wavy horizon, you can straighten out the horizon. For that, click on "Preview panorama" button in the toolbar.

Then click on "Straighten" button in the Panorama preview window.

Once you are satisfied with the stitch result, you can go ahead, and export it to an image file. For that, go to "Stitcher" tab in the Hugin's main window, and do the following.
Adjust canvas size, and amount of crop. Also, select output format (e.g., TIFF, JPEG, PNG). Finally, click on "Stitch!" button.

You will be asked to save a current project file (*.pto), and then specify output file name for the stitched photo.
It will take a couple of seconds to finalize photo stitch.
Here is the output of my experiment with Hugin. This is a beautiful panoramic view of luxury beach front in Cancun, Mexico. :-)

TERIMA KASIH ATAS KUNJUNGAN SAUDARA
Judul: How to stitch photos together on Linux
Ditulis oleh Unknown
Rating Blog 5 dari 5
Semoga artikel ini bermanfaat bagi saudara. Jika ingin mengutip, baik itu sebagian atau keseluruhan dari isi artikel ini harap menyertakan link dofollow ke http://androidjapane.blogspot.com/2013/12/how-to-stitch-photos-together-on-linux.html. Terima kasih sudah singgah membaca artikel ini.Ditulis oleh Unknown
Rating Blog 5 dari 5


0 komentar:
Posting Komentar