How to search files using the find command in Linux

Posted by Unknown Minggu, 23 September 2012 0 komentar
http://www.aliencoders.com/content/how-search-files-using-find-command-linux


If you are at *nix system, whether you are System administrator, common user, programmer or whoever; you will surely need to find file using different criteria. For that *nix system has very powerful and efficient command called “find”.
The find command is a powerful *nix utility that allows the user to find files located in the file system through various criteria such as the file name, owner, group, size, inodes, when file was last accessed, when the file status was last changed, the file's permissions, even using regular expression pattern etc.
I will try to cover maximum usage of commands that you are gonna need for any such operations. I hope after reading those examples one will easily use find command for one's problem.

Syntax for find command:
 
find where-to-look criteria what-to-do
 

Instead of explaining each options and then showing you its uses with examples, better to see the use of all options while going through different examples based on various requirements.

Examples
1.       Find a file "alien.coders" that exists somewhere in the file system
 
$ find / -name foo.bar -print


If the file is found the path to the file will be printed as output. On most platforms the -print is optional, however, on some *NIX systems nothing will be printed without using print. If you don’t provide any arguments, find searches recursively through all the directories.

2.Find a file without searching network or mounted file systems
 
$ find / -name alien.coders -print -xdev
 

I found it useful, when you have mounted network drives or file systems that you do not want searched (Like Windows box or other remote servers). This will surely increase the search speed greatly if the mounted file system is large or over a slow network. "-mount" does the same thing as "-xdev"  to make it compatible with other versions of find.

3.Find a file without showing "Permission Denied" messages
 
$ find / -name alien.coders -print 2>/dev/null
 

When find tries to search a directory or file that you do not have permission to read the message "Permission Denied" will be output to the screen. The 2>/dev/null option sends these messages to /dev/null so that the found files are easily viewed.

4.Find a file, who's name ends with .coders, within the current directory and only search 3 directories deep
 
$ find . -name *.coders -maxdepth 3 –print
 

-maxdepth option allows you to specify till how much deeper you want to search for a file by specifying n digit i.e. –max depth 3 in the above example.

5.Search directories "./dir1" and "./dir2" for a file "alien.coders"
 
$ find ./dir1 ./dir2 -name alien.coders -print


6.Search for files that are owned by the user "aliens"
 
$ find /alice/in/wonderland/ -user aliens -print
 

The files output will belong to the user "aliencs". Similar criteria are -uid to search for a user by their numerical id, -group to search by a group name, and -gid to search by a group id number.

7.Find a file that is a certain type. "-type l" searches for symbolic links ( manual page of find has lot more explanation on this)
 
$ find /some/directory -type l -print
 

Several types of files can be searched for:
  • b    block (buffered) special
  • c    character (un-buffered) special
  • d    directory
  • p    named pipe (FIFO)
  • f     regular file
  • l     symbolic link
  • s    socket
  • D   door (Solaris)

8.Search for directories that contains the word "alien" but do not end with ".coders"
 
$ find . -name '*alien*' ! -name '*.coders' -type d -print
 

The "!" allows you to exclude results that contain the phrases following it.

9.Search files which are modified between 10 and 60 minutes:
 
find . -mmin +9 -mmin -61
 

 (-mmin  +or – n is for minutes and –mtime + or – n is for no of days ( n*24 hours format))
(-n means less than n and +n means more than n like -9 and +61 in that example)

10.find files n days older and above certain file size
We have already seen the use of mtime and we will combine with –size option to find files which are n days older and greater than some file size in *nix. This is very common scenario for system administrator people where they need to delete some large old files to free some space in the machine.
This example of find command will find which are more than 30 days old and size greater than 1MB (1024 Kilo bytes with k option or 1024*1024 Bytes with c option instead of M and G for GB i.e. –size +1G for greater than 1Gb file size).
 
find . -mtime +10 -size +1M -exec ls -l {} \;


11.   Search files which are writable by both their owner and group:
 
find . -perm -220
 

or
 
find . -perm -g+w,u+w


The power of find
find becomes extremely useful when combined with other commands. One such combination would be using find and grep together or with xargs and awk etc.
 
$ find dir-path -type f -name '*.txt' -exec grep -s Aliens {} \; -print
 

This sequence uses find to look in give path for a file (-type f) with a name ending in .txt. It sends the files it finds to the grep command via the -exec option and grep searches the file found for any occurrences of the word "Aliens".
If the file is found it will be output to the screen and if the word "Aliens" is found, within one of the found files, the line that "Aliens" occurs in will also be output to the screen.

12.   Find files and print those files whose name contains core.two-or-more-numeric-digits :
Without Regular Expression
 
find directory-path -name "core.[0-9][0-9]*[0-9]" | xargs ls -lRt | awk '{print $9}’


With regular expression
 
find directory-path -type f -regex ".*/core\.[0-9]*" | xargs -r ls -lRt | awk '{print $9}'


13.   Find files using regular expression and avoid hard link count error
 
find directory-path -noleaf -type f -regex ".*/core\.[0-9]*" | xargs -r ls -lRt | awk '{print $9}'


Some points to remember while using find command in Linux:
  • All arguments are optional though, but what you will do without any argument? What I meant is, if you write just find, then also it will work.
 
find
find .
find . -print
find -print


All commands would fetch you the same result. i.e it will display the pathnames of all files in the current directory and all sub directories.
 
  • If find command doesn’t locate any matching files then it will produce no output
  • You may specify as many place as you wish to search the file. Ex: find /etc/dev /home/aliencoders/ . –name test
  • -print action lists the names of files separated by a new line or even send find’s output to xrags though pipe which separates file names using white space. So, it may cause an error if space or new line is encountered in any file name.
    No issues, we have better solution. Use “-print0” instead :D
  • For better format output, try to use printf similar to C programming language.
    ex: find . –name ‘[!.]*’ –printf ‘Name: %10f  Size: %5s \n’
  • Note: The ordering of find's options is important for getting the expected results as well as for performance reason.
What is the real difference between exec and xargs (Source: unix.com)?
find . -name H* -exec ls -l {} \; executes the command ls -l on each individual file.
find . -name H* | xargs ls -l constructs an argument list from the output of the find commend and passes it to ls.

Consider if the ouput of the find command produced:
H1
H2
H3

the first command would execute
ls -l H1
ls -l H2
ls -l H3

but the second would execute
ls -l H1 H2 H3

the second (xargs) is faster because xargs will collect file names and execute a command with as long as a length as possible. Often this will be just a single command.

If file name is having space then xargs will fail but exec will work because e
ach filename is passes to exec as a single value, with special characters escaped, so it is as if the filename has been enclosed in single quotes.
 
 For more details about how to use different arguments and options type man find

Baca Selengkapnya ....

80 Open Source Replacements for Audio-Video Tools

Posted by Unknown Kamis, 20 September 2012 1 komentar
http://www.datamation.com/open-source/80-open-source-replacements-for-audio-video-tools-1.html


Multimedia creation and consumption continue to be among the most common uses for PCs and mobile devices. Consider: According to recent research from the Pew Internet and American Life Project, 46 percent of U.S. Internet users have posted original videos or photos online. Seventy-one percent of online Americans have used a video sharing site like YouTube or Vimeo.
Recording industry trade association IFPI reports that more than half of record company revenues from the U.S. come from digital music, and those digital music revenues continue to grow every year. Global Industry Analysts forecasts that mobile entertainment, including video and music, will be a $67.6 billion industry by 2018.
In light of the massive amounts of time and money computer users spend creating and consuming multimedia content, we've updated our list of open source replacements for popular audio and video tools. While some commercial audio and video software can cost hundreds of dollars, open source software often offers very similar--or even better--capabilities for free.
Before we get to the list, it's worth noting that when we highlight an application as a "replacement" for another program, we aren't saying that they necessarily have all of the same features. Instead, we're saying that the two applications perform similar kinds of tasks, and if you're considering a closed-source option in one of these categories, you might also want to consider the open source alternatives we've listed.
As always, if you'd like to call our attention to other noteworthy open source software, please do so in the comments section below.

Animation

1. Blender
Replaces: AutoDesk Maya
This professional-caliber 3D content creation suite includes tools for modeling, shading, animation, rendering and compositing. Check out the gallery of movies, videos and stills on this site. Operating System: Windows, Linux, OS X.
2. Art of Illusion
Replaces: AutoDesk Maya
While not as full-featured as Blender or Maya, Art of Illusion offers basic 3D modeling and editing tools for amateur hobbyists. The interface is intuitive, and a number of tutorials are available. Operating System: OS Independent.
3. K-3D
Replaces: AutoDesk Maya
Another tool that's best suited for hobbyists, K-3D claims it "excels at polygonal modeling." Like Blender, K-3D also offers a gallery of still and animated art. Operating System: Windows, Linux, OS X.
4. Pencil
Replaces: ToonBoom Software
If you'd like to try your hand at old-school hand-drawn animation, give Pencil a try. It offers an easy-to-use interface, and it supports both bitmap and vector graphics. Operating System: Windows, Linux, OS X.
5. Synfig Studio
Replaces: ToonBoom Software
This 2D animation tool aims to make it possible to create professional-quality animation with fewer people and resources. It supports both vector and bitmap artwork. Operating System: Windows, Linux, OS X.

Audio Players

6. Songbird
Replaces: iTunes
More than just an audio player, Songbird positions itself as a way to discover music effortlessly with recommendations based on your interests and your Facebook friends' likes. It offers Web, desktop and Android versions, with an iPhone version on the way. Operating System: Windows, OS X, Android.
7. Amarok
Replaces: iTunes
Amarok's claim to fame is its integration with multiple Web services, including Last.fm, Ampache, Magnatunes, MP3tunes, Echo Nest, Jamendo and others. It can also import your iTunes database, including your statistics and ratings. Operating System: Windows, Linux, OS X, iOS.
8. Aqualung
Replaces: iTunes
This app plays most kinds of audio files, including audio CDs, internet radio streams and podcasts. Other features include gap-free playback of consecutive tracks, multiple playlists, multiple skins and support for numerous input and output file types. Operating System: Windows, Linux, OS X.
9. aTunes
Replaces: iTunes
Java-based aTunes is both an audio player and a file manager. The interface is very basic, but it does provide contextual information like song lyrics, artist information and related YouTube videos. Operating System: OS Independent.
10. Audacious
Replaces: iTunes
Audacious offers excellent audio playback without consuming too many system resources. Features include a drag-and-drop interface, search capabilities, a graphical equalizer and more. Operating System: Windows, Linux.
11. Jajuk
Replaces: iTunes
Critics have called Jajuk "the most powerful jukebox out there." It's a full-featured music player designed for those with large or scattered music collections, and it's available as a download or as a Web app. Operating System: OS Independent.
12. Jukes
Replaces: iTunes
First released in 1998 as "Put Up Your Jukes," this older audio player was "created for the serious music lover." It offers an easy-to-use interface that works well with large music libraries. Operating System: Windows, Linux, OS X.
13. Rhythmbox
Replaces: Windows Media Player, iTunes
This Linux audio player for the Gnome desktop offers excellent media management capabilities inspired by iTunes. It plays most audio formats, transfers music to and from other devices, plays Internet radio, displays album art and lyrics, and more. Operating System: Linux.
14. CoolPlayer
Replaces: Windows Media Player
This "blazing fast" audio player offers a lightweight size, although it does lack some of the more advanced features of some similar apps. Multiple skins and plug-ins are available. Operating System: Windows.
15. Zinf
Replaces: Windows Media Player
Like CoolPlayer, Zinf offers a basic feature set for playing audio files on Windows systems. It plays audio CDs, MP3, Ogg/Vorbis, WAV and streaming formats. Operating System: Windows, Linux.
16. Moosic
Replaces: iTunes
For those who prefer the command line to a GUI, Moosic is a very simple client-server audio player. It supports MP3, Ogg, MIDI, MOD and WAV files by default, or you can configure it to play other file types. Operating System: Linux/Unix.
17. DeaDBeeF
Replaces: Windows Media Player, RealPlayer, QuickTime
The self-proclaimed "Ultimate Music Player For GNU/Linux," DeaDBeeF can play mp3, ogg vorbis, flac, ape, wv, wav, m4a, mpc, tta, CD audio and many other formats. Features include a drag-and-drop interface, support for multiple playlists, 18-band graphical equalizer, album art integration, optional command line controls, gapless playback and more. Operating System: Linux, Unix.

Audio Recorders and Editors

18. Ardour
Replaces: Sonar X1, Adobe Audition, Sony ACID
Suitable for use by professionals, Ardour offers highly advanced audio recording, mixing and non-linear editing capabilities. Key features include unlimited tracks, unlimited undo, 32-bit floating point audio path, sample accurate automation, more than 200 plug-ins and much more. Operating System: Linux, OS X.
19. Audacity
Replaces: Sonar X1, Adobe Audition, Sony ACID
While it isn't as full-featured as the commercial audio recording tools above, Audacity offers an impressive set of capabilities suitable for garage bands and hobbyists who are just getting started. It records live audio, converts among various file formats, allows users to edit sounds together in various ways and much more. Operating System: Windows, Linux, OS X.
20. Frinika
Replaces: Sonar X1, Adobe Audition, Sony ACID
Like Audacity, Frinika offers music recording and editing features suitable for amateur musicians. Key features include sequencer, midi support, soft synthesizers, audio recorder and piano roll/tracker/notation editing. Operating System: OS Independent.


Audio Ripping and Conversion

21. CDex
Replaces: Direct Audio Converter and CD Ripper, Exact Audio Copy, Audio Convertor Studio
This very popular CD ripper boasts more than 40 million downloads. It supports numerous encoders, including Lame MP3, Internal MP2, APE lossless audio format, Ogg Vorbis, Windows MP3 (Fraunhofer MP3), NTT VQF, FAAC and Windows WMA8. Operating System: Windows.
22. Free:ac
Replaces: Direct Audio Converter and CD Ripper, Exact Audio Copy, Audio Convertor Studio
Short for "free audio converter," free:ac converts among MP3, MP4/M4A, WMA, Ogg Vorbis, FLAC, AAC, WAV and Bonk formats. It's available in a portable version, and it comes in 37 different languages. Operating System: Windows.
23. MMConvert
Replaces: Direct Audio Converter and CD Ripper, Exact Audio Copy, Audio Convertor Studio
MMConvert aims to convert both audio and video files among various popular formats. However, it has a spotty reputation and is better at some conversions than others Operating System: Windows.

Audio Mixing/DJ Tools

24. Mixxx
Replaces: Traktor Scratch, Scratch Live
Mixxx claims to offer "everything you need to start making DJ mixes in a tight, integrated package." Key features include iTunes integration, BPM detection and sync, support for more than 30 MIDI controllers and a cutting-edge mixing engine. Operating System: Windows, Linux, OS X.
25. Mixere
Replaces: Traktor Scratch, Scratch Live
Optimized for live performances, Mixere has a simple, spreadsheet-like interface. It offers unlimited file size, an unlimited number of tracks, unlimited undo, auto-triggering, fully automated sliders and more. Operating System: Windows.

CD/DVD Burning

26. AVStoDVD
Replaces: Nero Burning ROM, Roxio Creator
This helpful tool can convert various multimedia file types to DVD-ready formats and then burn them to DVDs. It supports multiple tracks and offers some audio and video editing capabilities. Operating System: Windows.
27. Burn
Replaces: Nero Burning ROM, Roxio Creator
For Macs only, this burning tool can create data, audio or video CDs and DVDs. It can also copy discs, even if you only have a single optical drive. Operating System: OS X.
28. InfraRecorder
Replaces: Nero Burning ROM, Roxio Creator
This Windows-only CD and DVD burner integrates directly into Windows Explorer. It can create audio, data or mixed-mode discs, and it offers four different methods for erasing rewritable media. Operating System: Windows.
29. DVDStyler
Replaces: Nero Burning ROM, Roxio Creator
This app aims to make it easy for anyone to create professional-looking DVDs, complete with interactive menus. It includes tools for adding subtitles, mixing multiple audio tracks and creating photo slideshows. Operating System: Windows, Linux, OS X.
30. Cdrtools
Replaces: Nero Burning ROM, Roxio Creator
First released in 1996, Cdrtools offer Linux users a set of nine different tools for recording CDs, DVDs and BluRay discs. Note that it runs from the command line. Operating System: Linux.

File Sharing Clients

31. eMule/eMule Plus
Replaces: BearShare, BitTorrent (6.0 is no longer open source), iMesh
Considered by many to be the best P2P client available, eMule is now optimized for use with Windows 7. The eMule Plus version offers a slightly different interface, plus enhanced performance and IRC integration. Operating System: Windows.
32. Ares P2P
Replaces: BearShare, BitTorrent, iMesh
Ares has its own network with integrated chat, and it also supports BitTorrent protocol and Shoutcast radio stations. Key features include fast downloads, a built-in media player and a library organizer. Operating System: Windows.
33. Shareaza P2P
Replaces:BearShare, BitTorrent, iMesh
Shareza calls itself the "ultimate P2P client" and boasts that it "just keeps getting better and better." It supports eDonkey2000, Gnutella, BitTorrent and Gnutella2 networks. Operating System: Windows.
34. BitTornado
Replaces: BearShare, BitTorrent, iMesh
As you might guess from the name, BitTornado is an alternative client for the BitTorrent network. It offers encryption and other enhanced security features. Operating System: Windows, Linux, OS X.
35. ABC (Yet Another BitTorrent Client)
Replaces: BearShare, BitTorrent, iMesh
This BitTornado fork adds a queuing system. Other key features include multiple downloads in a single window, customization capabilities, super-seed mode and more. Operating System: Windows.
36. DC++
Replaces: BearShare, BitTorrent, iMesh
Downloaded more than 50 million times, DC++ offers a lot of help for first-time P2P users. It connects with the Direct Connect / Advanced Direct Connect network. Operating System: Windows.
37. ANts P2P
Replaces: BearShare, BitTorrent, iMesh
ANts uses encryption and a host of other security features to enable anonymous file sharing. Note that the ANts network is smaller than many other file-sharing networks. Operating System: OS Independent.
38. Mute
Replaces: BearShare, BitTorrent , iMesh
Another P2P client with an emphasis on security, Mute uses indirect routing to help hide users' identities. Check out the site for an explanation of how its technology is based on the behavior of insects. Operating System: OS Independent.

Multimedia Players

39. VLC Media Player
Replaces: Windows Media Player, RealPlayer, QuickTime
This very popular open source app can play most streaming video and media files, audio CDs, DVDs and more. It comes with a skinnable interface or it can run from the command line, and it supports tags, subtitles and closed captioning. Operating System: Windows, Linux, OS X, others.
40. FFmpeg
Replaces: Windows Media Player, RealPlayer, QuickTime
More than just an audio and video player, FFmpeg also includes tools for recording, converting and streaming multimedia files. It humbly claims to be "the leading multimedia framework, able to decode, encode, transcode, mux, demux, stream, filter and play pretty much anything that humans and machines have created." Operating System: Windows, Linux, OS X.


41. Miro
Replaces: Windows Media Player, RealPlayer, QuickTime
This very attractive media player works on iOS and Android devices, including the Kindle Fire, as well as desktops. It offers easy import from iTunes, connections to Amazon and Google stores, conversion capabilities, sharing and very fast Torrent downloads. Operating System: Windows, Linux, OS X, Android, iPad.
42. Banshee
Replaces: Windows Media Player, RealPlayer, QuickTime
Banshee can sync your multimedia library with your mobile device, connect with the Amazon store, play podcasts and Internet radio, shuffle smartly and retrieve cover art from the Internet. It also offers optional Last.fm integration, eMusic integration, import from iTunes and other services, and minimode. Operating System: Windows, Linux, OS X, Android, iOS.
43. UMPlayer
Replaces: Windows Media Player, RealPlayer, QuickTime
The "Universal Media Player," UMPlayer includes more than 270 built-in codecs, so it can play nearly every kind of file, including incomplete or damaged files. Advanced features include a skinnable interface, subtitles search and sync, and a YouTube player and recording tool. Operating System: Windows, Linux, OS X.
44. Mplayer
Replaces: Windows Media Player, RealPlayer, QuickTime
This award-winning player also supports a long list of audio and video file types and codes. The standard edition is a command-line tool for Linux, but variations are available for other operating system, and there are also GUI front-ends available. Operating system: Linux.
45. XBMC Media Center
Replaces: Windows Media Player, RealPlayer, QuickTime
This media player was designed to work with home theater PCs (HTPCs). It offers an attractive interface, support for most remote controls, support for most popular audio and video formats, and playlist and slideshow capabilities. Operating System: Windows, Linux, OS X.
46. MediaPortal
Replaces: Windows Media Player, RealPlayer, QuickTime
Similar to XBMC, Media Portal also supports HTPCs and even turns ordinary PCs into advanced media centers. In addition to playing CDs, DVDs, multimedia files and streaming content, it lets you watch, schedule and record live TV like a TiVo, and it also works with most remote controls. Operating System: Windows.
47. Totem
Replaces: Windows Media Player, RealPlayer, QuickTime
The official movie player for the Gnome desktop, Totem boasts features like playlists, full-screen mode, seek, volume control, keyboard navigation and a nautilus properties tab. It also includes a Firefox plug-in for watching movies through your browser. Operating System: Linux.
48. Media Player Classic Home Cinema
Replaces: Windows Media Player, RealPlayer, QuickTime
This lightweight, customizable player looks and feels like older version of Windows Media Player. It supports numerous file types, and it has been translated into 23 languages. Operating System: Windows.
49. xine
Replaces: Windows Media Player, RealPlayer, QuickTime
Xine also plays an impressive list of multimedia formats. It features a skinnable interface, extensible architecture, fast performance, navigation controls, playlists, image snapshots, aspect ratio conversion, full-screen mode and much more. Operating System: OS X, Linux.

Multimedia Library Management

50. Data Crow
Replaces: MediaMan
If you've been wanting to organize your CDs, DVDs, books and/or digital files, Data Crow is for you. It creates an electronic catalog of everything in your media collection, complete with data imported from Amazon.com, Imdb.com, Softpedia and MusicBrainz, and it even tracks which of your friends have borrowed your stuff. Operating System: OS Independent.
51. Wwidd
Replaces: MediaMan
Wwidd describes itself as "Del.icio.us for your video collection." It makes it easy to organize, tag and search your video library, and it integrates with VLC for playback. (Note that the source code is available through GitHub. Operating System: Windows, OS X, Linux.

Music Composition

52. DrumTrack
Replaces: DrumCore
This open source app makes it easy to create your own rhythm track with nothing more than your keyboard. It uses multiple audio samples of actual drums, plus volume randomization, to help create the illusion that the track is being played live by an actual human. Operating System: Windows.
53. Hydrogen
Replaces: DrumCore
Suitable for use by professional musicians and producers, Hydrogen is a powerful drum track creation system with an easy-to-use GUI. The latest version adds features like a sample editor, time stretch and pitch functions, playlists, advanced tab-tempo, director window, timeline with variable tempo, single and stacked pattern mode and more. Operating System: Windows, Linux, OS X.
54. Linux MultiMedia Studio
Replaces: FL Studio
Specifically designed as a free alternative to FL Studio, LMMS lets users create, mix and edit sounds. It supports MIDI keyboards and includes a song editor, piano roll, FX mixer and numerous instruments and effects. Operating System: Windows, Linux.
55. TuxGuitar
Replaces: GuitarPro
Like GuitarPro, this app allows you to create and edit multi-track tab scores and play them back. Key features include tempo management, time signature management, autoscroll, special effects and import and export. Operating System: Windows, Linux, OS X.
56. MuseScore
Replaces: Finale
Sheet music creation software can cost hundreds of dollars, but this tool creates attractive scores for free--and it plays them back. Capabilities include unlimited score length, unlimited staves, four independent voices per staff, chord symbols, jazz notation, percussion notation and much more. Operating System: Windows, Linux, OS X.

Screen Video Capture

57. CamStudio
Replaces: Camtasia
Many individuals and organizations need to make demonstration videos on occasion, but commercial screen video capture software can be very expensive. CamStudio can record your system's on-screen and audio activities, plus it offers some basic editing capabilities. Operating System: Windows.
58. Krut Computer Recorder
Replaces: Camtasia
Java-based Krut can record screen video from nearly any system. Key features include timer control, the ability to move recording areas, two choices for frame rates and highly accurate audio/video synchronization. Operating System: Windows, Linux OS X.
59. Webinaria
Replaces: Camtasia
In addition to downloadable screen capture software, this website also offers the opportunity to share your own creations and view other people's webinars and tutorials. A built-in rating system and discussion capabilities makes the site even more interesting. Operating System: Windows, Linux OS X.

Server Software

60. Ampache
Replaces: Real Helix, Adobe Flash Media Streaming Server, QuickTime Streaming Server
Want to set up your own streaming server? Ampache makes it easy and affordable and allows you to access your music and videos from any Internet-connect device. Operating System: Windows, Linux, OS X.


61. VideoLAN
Replaces: Real Helix, Adobe Flash Media Streaming Server, QuickTime Streaming Server
From the creators of the VLC Media Player, this is another option for setting up an audio/video streaming server. Like the Media Player, it supports a wide array of file formats. Operating System: Windows, Linux, OS X.
62. Subsonic
Replaces: Real Helix, Adobe Flash Media Streaming Server, QuickTime Streaming Server
Subsonic can function as a streaming media server or a local jukebox. With apps available for Android, iPhone, Windows Phone, BlackBerry, Roku, PlayBook and others, it's easy to take your music and movies with your wherever you go. And if you don't have a server of your own, hosting services are also available. Operating System: Windows, Linux, OS X, Android, iOS, Windows Phone, BlackBerry, Roku, others.
63. AmpJuke
Replaces: Real Helix, Adobe Flash Media Streaming Server, QuickTime Streaming Server
While most of the other options on our list stream both audio and video files, AmpJuke focuses on music. It also connects to various Web services in order to provide lyrics, album covers and other data related to the songs being played. Operating System: Windows, Linux, OS X.
64. Mp3dj
Replaces: Real Helix, Adobe Flash Media Streaming Server, QuickTime Streaming Server
Another audio-only tool, mp3dj allows users to search, browse or play their MP3 collections remotely via a Web browser. The interface is basic, but easy to use. Operating System: Windows, Linux, OS X.
65. kPlaylist
Replaces: Real Helix, Adobe Flash Media Streaming Server, QuickTime Streaming Server
KPlaylist was also designed with music streaming in mind, but it can support both audio and video files. Features include multi-user support with authentication, Flash player support, Shoutcast support, randomizer function, shared playlists and more. Operating System: Windows, Linux.
66. Darwin Streaming Server
Replaces: QuickTime Streaming Server
Based on the same code as the QuickTime Streaming Server, Darwin was also developed by Apple. It can stream live or pre-recorded content using RTP/RTSP protocols. Operating System: Windows, Linux, OS X.

Subtitles

67. Amara
Replaces: Softel Swift, EZTitles
From the same group behind the Miro multimedia player, award-winning Amara aims to make it easier to subtitle and translate video. The project includes both downloadable software and a website for working on projects collaboratively. Operating System: Windows, Linux, OS X.

Video Editing

68. Cinelerra
Replaces: Adobe Premiere
Cinelerra promises to "unleash the 50,000 watt flamethrower of content creation in your UNIX box." While it doesn't claim to offer all the features available in leading commercial video editors, it does offer many advanced video compositing and editing capabilities. Operating System: Linux.
69. CinelerraCV
Replaces: Adobe Premiere
The standard version of Cinelerra doesn't get updated very regularly, but this community-managed fork has added features and bug fixes more recently. It claims to be "the most advanced non-linear video editor and compositor for Linux." Operating System: Linux.
70. OpenShot Video Editor
Replaces: Adobe Premiere
Designed to be easy to use, powerful and stable, OpenShot is a popular Linux-only video editor. Check out the website for some helpful tutorials and an interesting blog that chronicles the project's development. Operating System: Linux.
71. Kdenlive
Replaces: Adobe Premiere
The self-proclaimed "most versatile video editor available today," Kdenlive is designed to appeal to both amateurs and professional filmmakers. Key features include support for most camcorders and cameras, multi-track audio and video editing, numerous special effects and transitions, intuitive interface and more. Operating System: Linux, OS X.
72. Avidemux
Replaces: Adobe Premiere
Avidemux is not as full-featured as commercial video editors, but it does have sufficient capabilities to meet the needs of most amateurs. It supports multiple file types and includes automation and job queue features. Operating System: Windows, Linux, OS X, others.
73. VirtualDub
Replaces: Adobe Premiere
Another "lite" offering, VirtualDub offers basic video capture and processing. It works best with AVI files. Operating System: Windows.
74. PhotoFilmStrip
Replaces: Adobe Premiere
While it's not a full-featured video editor like Premiere, PhotoFilmStrip is a good option for amateurs who want to make a movie out of existing photos. It uses the "Ken Burns" effect on your photos to make a much more interesting show than you could with PowerPoint or similar presentation software. Operating System: Windows, Linux.
75. LiVES
Replaces: "a href="http://www.resolume.com/avenue/">Resolume Avenue 3, AVMixer
LiVES, which stands for "LiVES is a Video Editing System," is both a tool for VJs and a non-linear video editing tool. It's frame and sample accurate, supports the latest standards and includes dozens of special effects. Operating System: Windows, Linux, OS X.

Video File Conversion

76. DVDx
Replaces: Movavi Video Converter
Convert DVDs to any of the popular file formats with DVDx. It can also correct some file errors, split videos into smaller files or merge several files into one larger file. Operating System: Windows, Linux, OS X.
77. DVD Flick
Replaces: Movavi Video Converter
This app focuses on converting video or audio files saved on your system into playable DVDs. It offers the options of adding a menu and subtitles as well. Operating System: Windows.
78. HandBrake
Replaces: Movavi Video Converter
This newer conversion tool also helps convert DVDs or BluRay disks to other formats. Features include chapter selection and markers, subtitles, support for numerous filters and live video preview. Operating System: Windows.
79. Media Converter
Replaces: Movavi Video Converter
This Mac-only converter supports avi, wmv, mkv, rm, mov and several other file types. A lot of its code is based on the Burn CD burning software (see above). Operating System: OS X.
80. SoX
Replaces: Movavi Video Converter
Described as the "Swiss Army knife of sound processing programs," SoX can convert among various file formats, add special effects, play files and record sounds. It's a command line tool, but it works on Windows and OS X as well as Linux. Operating System: Windows, Linux, OS X.


Baca Selengkapnya ....

Introduction: Using diff and patch

Posted by Unknown Rabu, 19 September 2012 0 komentar
http://tuts.pinehead.tv/2012/09/18/introduction-using-diff-and-patch


The commands diff and patch form a powerful combination. They are widely used to get differences between original files and updated files in such a way that other people who only have the original files can turn them into the updated files with just a single patch file that contains only the differences. This tutorial explains the basics of how to use these great commands.
Difficulty: Medium
This tutorial assumes some basic Linux and command line knowledge, like changing directories, copying files and editing text files.

Using diff to create a simple patch

The most simple way of using diff is getting the differences between two files, an original file and an updated file. You could, for example, write a few words in a normal text file, make some modifications, and then save the modified content to a second file. Then, you could compare these files with diff, like this:
[rechosen@localhost ~]$ diff originalfile updatedfile
Of course, replace originalfile and updatedfile with the appropiate filenames of your case. You will most probably get an output like this:
1c1
< These are a few words.
\ No newline at end of file

> These still are just a few words.
\ No newline at end of file
Note: to demonstrate the creation of a simple patch, I used the file originalfile with the content “These are a few words.” and the file updatedfile with the content “These still are just a few words.”. You can create these files yourself if you want to run the commands in the tutorial and get about the same output.
The 1c1 is a way of indicating line numbers and specifying what should be done. Note that those line numbers can also be line ranges (12,15 means line 12 to line 15). The “c” tells patch to replace the content of the lines. Two other characters with a meaning exist: “a” and “d”, with “a” meaning “add” or “append” and “d” meaning “delete”. The syntax is (line number or range)(c, a or d)(line number or range), although when using “a” or “d”, one of the (line number or range) parts may only contain a single line number.
  • When using “c”, the line numbers left of it are the lines in the original file that should be replaced with text contained in the patch, and the line numbers right of it are the lines the content should be in in the patched version of the file.
  • When using “a”, the line number on the left may only be a single number, meaning where to add the lines in the patched version of the file, and the line numbers right of it are the lines the content should be in in the patched version of the file.
  • When using “d”, the line numbers left of it are the lines that should be deleted to create the patched version of the file, and the line number on the right may only be a single number, telling where the lines would have been in the patched version of the file if they wouldn’t have been deleted. You might think that that last number is redundant, but remember that patches can also be applied in a reverse way. I’ll explain more about that later on in this tutorial.
The “<” means that patch should remove the characters after this sign, and the “>” means that the characters after this sign should be added. When replacing content (a “c” between the line numbers), you will see both the < and the > sign. When adding content (an “a” between the line numbers), you’ll only see the > sign, and when deleting content (a “d” between the line numbers), only the < sign.
The “\”, followed by “No newline at end of file”, is only there because I didn’t press enter after typing the words. Generally, it always is good practice to add a final newline to every text file you create. Certain pieces of software can’t do without them. Therefore, the absence of a final newline is reported so explicit by diff. Adding final newlines to the files makes the output a lot shorter:
1c1
< These are a few words.

> These still are just a few words.
As you may have noticed, I omitted explaining what the 3 -’s are for. They indicate the end of the lines that should be replaced and the beginning of the lines that should replace them. They separate the old and the new lines. You will only see these when replacing content (a “c” between the line numbers).
If we want to create a patch, we should put the output of diff into a file. Of course, you could do this by copying the output from your console and, after pasting it in your favourite text editor, saving the file, but there is a shorter way. We can let bash write diff’s output to a file for us this way:
[rechosen@localhost ~]$ diff originalfile updatedfile > patchfile.patch
Again, replace the filenames with the ones appropiate in your case. You might like to know that telling bash to write a command’s output to a file using > works with every command. This can be very useful to save to output of a command to a (log) file.

Applying the simple patch we created

Well then, did we just create a patch? The short answer is: yes, we did. We can use the patchfile to change a copy of originalfile to a copy of updatedfile. Of course, it wouldn’t make that much sense to apply the patch on the files we created the patch from. Therefore, copy the original file and the patchfile to an other place, and go to that place. Then, try applying the patch this way:
[rechosen@localhost ~]$ patch originalfile -i patchfile.patch -o updatedfile
Again, replace the filenames where necessary. If all went well, the file updatedfile just created by patch should be identical to the one you had at first, when creating the patch with diff. You can check this using diff’s -s option:
[rechosen@localhost ~]$ diff -s updatedfile [/path/to/the/original/updatedfile]/updatefile
Replace the part between [ and ] with the path to the original update file. For example, if the updatedfile you used when creating the patch is located in the parent directory of your current directory, replace “[/path/to/the/original/updatedfile]” with “..” (bash understands this as the parent directory of the current working directory). And of course, also replace the filenames again where appropiate.
Congratulations! If diff reported the files to be equal, you just succesfully created and used a patch! However, the patch format we just used is not the only one. In the next chapter, I will explain about an other patch format.

Contextual patching

In the first chapter, we created a patch using diff’s normal format. This format, however, doesn’t provide any of the lines of context around the ones to be replaced, and therefore, a change in the line numbers (one or more extra newlines somewhere, or some deleted lines) would make it very difficult for the patch program to determine which lines to change instead. Also, if a different file that is being patched by accident contains the same lines as the original file at the right places, patch will happily apply the patchfile’s changes to this file. This could result in broken code and other unwanted side-effects. Fortunately, diff supports other formats than the normal one. Let’s create a patch for the same files, but this time using the context output format:
[rechosen@localhost ~]$ diff -c originalfile updatedfile
By now, it should be clear that you should replace the filenames where necessary =). You should get an output like this:
*** originalfile 2007-02-03 22:15:48.000000000 0100
— updatedfile 2007-02-03 22:15:56.000000000 0100
***************
*** 1 ****
! These are a few words.
— 1 —-
! These still are just a few words.
As you can see, the filenames are included. This will save us some typing when applying the patch. The timestamps you can see next to the filenames are the date and time of the last modification of the file. The line with 15 *’s indicates the starting of a hunk. A hunk describes which changes, like replacements, additions and deletions, should be made to a certain block of text. The two numbers 1 are line numbers (again, these can also be line ranges (12,15 means line 12 to line 15)), and ! means that the line should be replaced. The line with a ! before the three -’s (hey, where did we see those before?) should be replaced by the second line with a !, after the three -’s (of course, the ! itself will not be included; it’s context format syntax).
As you can see, there aren’t any c’s, a’s and d’s here. The action to perform is determined by the character in front of the line. The !, as explained, means that the line should be replaced. The other available characters are +, – and ” ” (a space). The + means add (or append), the – means delete, and the ” ” means nothing: patch will only use it as context to be sure it’s modifying the right part of the file.
Applying this patch is a bit easier: under the same circumstances as before (let bash write the diff output to a file again, then copy the patchfile and the original file to an other location), you’ll need to run:
[rechosen@localhost ~]$ patch -i patchfile.patch -o updatedfile
You’ll probably think now: why do we still have to specify the new filename? Well, that’s because patch was made with the intention to update existing files in mind, not to create new updated files. This usually comes in handy when patching source trees of programs, which is pretty much the main use of patch. And that brings us to our next subject: to patch a whole source tree, multiple files should included in the patchfile. The next chapter will tell how to do this.

Getting the differences between multiple files

The easiest way to get the differences between multiple files is to put them all in a directory and to let diff compare the whole directories. You can just specify directories instead of files, diff will autodetect whether you’re giving it a file or a directory:
[rechosen@localhost ~]$ diff originaldirectory/ updateddirectory/
Note: if the directories you’re comparing also include subdirectories, you should add the -r option to make diff compare the files in subdirectories, too.
This should give an output like this:
diff originaldirectory/file1 updateddirectory/file1
1c1
< This is the first original file.

> This is the first updated file.
diff originaldirectory/file2 updateddirectory/file2
1c1
< This is the second original file.

> This is the second updated file.
14d13
< We’re going to add something in this file and to delete this line.
26a26
> This is line has been added to this updated file.
Note: for this example, I created some example files. You can download an archive containing these files here: http://www.linuxtutorialblog.com/post/introduction-using-diff-and-patch-tutorial/diffpatchexamplefiles.tar.gz.
As you can see, the normal output format only specifies filenames when comparing multiple files. You can also see examples of the addition and deletion of lines.
Now, let’s have a look at the output of the same comparison in the context format:
diff -c originaldirectory/file1 updateddirectory/file1
*** originaldirectory/file1 2007-02-04 16:17:57.000000000 +0100
— updateddirectory/file1 2007-02-04 16:18:33.000000000 +0100
***************
*** 1 ****
! This is the first original file.
— 1 —-
! This is the first updated file.
diff -c originaldirectory/file2 updateddirectory/file2
*** originaldirectory/file2 2007-02-04 16:19:37.000000000 +0100
— updateddirectory/file2 2007-02-04 16:20:08.000000000 +0100
***************
*** 1,4 ****
! This is the second original file.
S
O
— 1,4 —-
! This is the second updated file.
S
O
***************
*** 11,17 ****
C
E
- We’re going to add something in this file and to delete this line.
S
O
— 11,16 —-
***************
*** 24,28 ****
— 23,28 —-
C
E
+ This is line has been added to this updated file.
Something will be added above this line.
The first thing you should notice is increase in length; the context format provides more information than the normal format. This wasn’t that visible in the first example, as there wasn’t any context to include. However, this time there was context, and that surely lenghtens the patch a lot. You might also have noticed that the filenames are mentioned twice every time. This is probably done either to make it easier for patch to recognize when to start patching the next file, or to provide better backwards-compatibility (or both).
The other way to let diff compare multiple files is writing a shell script that runs diff multiple times and correctly adds all output to one file, including the lines with the diff commands. I will not tell you how to do this as the other way (putting the files in a directory) is a lot easier and is used widely.
Creating this patch with diff was considerably easy, but the use of directories kicks in a new problem: will patch just patch the mentioned files in the current working directory and forget about the directory they were in when creating the patch, or will it patch the files inside the directories specified in the patch? Have a look at the next chapter to find out!

Patching multiple files

In the chapter before this one, we created a patch that can be used to patch multiple files. If you haven’t done so already, save diff’s output to an actual patchfile in a way like this:
[rechosen@localhost ~]$ diff -c originaldirectory/ updateddirectory/ > patchfile.patch
Note: we’ll be using the context format patch here as it generally is good practice to use a format that provides context.
It’s time to try using our patchfile. Copy the original directory and the patchfile to an other location, go to that other location, and apply the patch with this command:
[rechosen@localhost ~]$ patch -i patchfile.patch
Huh? It reports that it cannot find the file to patch! Yep, that’s right. It is trying to find the file file1 in the current directory (patch defaultly strips away all directories in front of the filename). Of course, this file isn’t there because we’re trying to update the file in the directory originaldirectory. For this reason, we should tell patch not to strip away any directories in the filenames. That can be done this way:
[rechosen@localhost ~]$ patch -p0 -i patchfile.patch
Note: you might think you could also just move into originaldirectory and run the patch command there. Don’t! This is bad practice: if the patchfile includes any files to patch in subdirectories, patch will look for them in the working directory, and, obviously, not find them or find the wrong ones. Use the -p option to make patch look in subdirectories as it should.
The -p options tells patch how many slashes (including what’s before them, usually directories) it should strip away before the filename (note that, when using the option -p0, patch looks for the files to patch in both originaldirectory and updateddirectory, in our case). In this case, we set it to 0 (do not strip away any slash), but you can also set it to 1 (to strip away the first slash including anything before it), or 2 (to strip away the first two slashes including everything before it), or any other amount. This can be very useful if you’ve got a patch which uses a different directory structure than you. For example: if you’d have a patch that uses a directory structure like this:
(…)
*** /home/username/sources/program/originaldirectory/file1 2007-02-04 16:17:57.000000000 +0100
— /home/username/sources/program/updateddirectory/file1 2007-02-04 16:18:33.000000000 +0100
(…)
You could just count the slashes (/ (1) home/ (2) username/ (3) sources/ (4) program/ (5)) and give that value with the -p option. If you’re using -p5, patch would look for both originaldirectory/file1 and updateddirectory/file1. Please do note that patch considers two slashes next to each other (like in /home/username//sources) as a single slash. This is because scripts sometimes (accidently or not) put an extra slash between directories.

Reversing an applied patch

Sometimes a patch is applied while it shouldn’t have been. For example: a patch introduces a new bug in some code, and a fixed patch is released. However, you already applied the old, buggy patch, and you can’t think of a quick way to get the original files again (maybe they were already patched dozens of times). You can then apply the buggy patch in a reversive way. The patch command will try to undo all changes it did by swapping the hunks. You can tell patch to try reversing by passing it the -R option:
[rechosen@localhost ~]$ patch -p0 -R -i patchfile.patch
Usually, this operation will succeed, and you’ll get back the original files you had. By the way, there is another reason why you’d want to reverse a patch: sometimes (especially when sleepy), people release a patch with the files swapped. You’ve got a big chance that patch will detect this automatically and ask you if you want it to try patching reversively. Sometimes, however, patch will not detect it and wonder why the files don’t seem to match. You can then try applying the patch in a reversed way manually, by passing the -R option to patch. It is good practice to make a backup before you try this, as it is possible that patch messes up and leaves you with irrecoverably spoiled files.

The unified format

The diff command can also output the differences in another format: the unified format. This format is more compact, as it omits redundant context lines and groups things like line number instructions. However, this format is currently only supported by GNU diff and patch. If you’re releasing a patch in this format, you should be sure that it will only be applied by GNU patch users. Pretty much every Linux flavour features GNU patch.
The unified format is similar to the context format, but it’s far from exactly the same. You can create a patch in the unified format this way:
[rechosen@localhost ~]$ diff -u originaldirectory/ updateddirectory/
The output should be something like this:
diff -u originaldirectory/file1 updateddirectory/file1
— originaldirectory/file1 2007-02-04 16:17:57.000000000 +0100
+++ updateddirectory/file1 2007-02-04 16:18:33.000000000 +0100
@@ -1 +1 @@
-This is the first original file.
+This is the first updated file.
diff -u originaldirectory/file2 updateddirectory/file2
— originaldirectory/file2 2007-02-04 16:19:37.000000000 +0100
+++ updateddirectory/file2 2007-02-04 16:20:08.000000000 +0100
@@ -1,4 +1,4 @@
-This is the second original file.
+This is the second updated file.
S
O
@@ -11,7 +11,6 @@
C
E
-We’re going to add something in this file and to delete this line.
S
O
@@ -24,5 +23,6 @@
C
E
+This is line has been added to this updated file.
Something will be added above this line.
As you can see, the line numbers/ranges are grouped and placed between @’s. Also, there is no extra space after + or -. This saves some bytes. Another difference: the unified format does not feature a special replacement sign. It simply deletes (the – sign) the old line and adds (the + sign) the altered line instead. The only difference between adding/deleting and replacing can be found in the line numbers/ranges: when replacing a line, these are the same, and when adding or deleting, they differ.

Format comparison

Having read about three formats, you probably wonder which one to choose. Here’s a small comparison:
  • The normal format features the best compatibility: pretty much every diff/patch-like command should recognize it. The lack of context is a big disadvantage, though.
  • The context format is widely supported, though not every diff/patch-like command knows it. However, the advantage of being able to include context makes up for that.
  • The unified format features context, too, and is more compact than the context format, but is only supported by a single brand of diff/patch-like commands.
If you’re sure that the patch will be used by GNU diff/patch users only, unified is the best choice, as it keeps your patch as compact as possible. In most other cases, however, the context format is the best choice. The normal format should only be used if you’re sure there’s a user without context format support.

Varying the amount of context lines

It is possible to make diff include less lines of context around the lines that should be changed. Especially in big patchfiles, this can strip away a lot of bytes and make your patchfile more portable. However, if you include too few lines of context, patch might not work correctly. Quoting the GNU diff man page: “For proper operation, patch typically needs at least two lines of context.”
Specifying the amount of context lines can be done in multiple ways:
  • If you want to use the context format, you can combine it into one option, the -C option. Example:
    [rechosen@localhost ~]$ diff -C 2 originaldirectory/ updateddirectory/
    The above command would use the context format with 2 context lines.
  • If you want to use the unified format, you can combine it into one option, the -U option. Example:
    [rechosen@localhost ~]$ diff -U 2 originaldirectory/ updateddirectory/
    The above command would use the unified format with 2 context lines.
  • Regardless which format you choose, you can specify the number of lines like this:
    [rechosen@localhost ~]$ diff -2 originaldirectory/ updateddirectory/
    However, this will only work if you also specify a context-supporting format. You’d have to combine this option either with -c or -u.

Final words

Although this tutorial describes a lot of features and workings of diff and patch, it does by far not describe everything you can do with these powerful tools. It is an introduction in the form of a tutorial. If you want to know more about these commands, you can read, for example, their manpages and GNU’s documentation about diff and patch.
Well then, I hope this tutorial helped you. Thank you for reading! If you liked this tutorial, browse around this blog and see if there are more you like. Please help this blog to grow by leaving a link here and there, and let other people benefit from the growing amount of knowledge on this site. Thanks in advance and happy patching!

Baca Selengkapnya ....

How to use multiple files efficiently in vim editor

Posted by Unknown Senin, 17 September 2012 0 komentar
http://www.aliencoders.com/content/how-use-multiple-files-efficiently-vim-editor


Many time we need to work with multiple files all together. If its windows system then we can use some GUI based editor to accomplish our task. But what if you are on putty or have only CLI(Command Line Interface) as an option to  edit your files. I prefer using vim editor.
After doing some experiments and knowing some important commands, I though to share with you. So i have written few commands point wise which may be useful for you while editing multiple files using vim (not GVIM, although these commands are valid there too.)
Tested on Linux box under vim v6.3 and vim v7.1
  • Open multiple files in vim altogether
    • Vim file1 file2 file3 ….
    • Vim dirPath/pattern for files like vim perlfiles/*.pl    
    • It will load in buffer simultaneously so that you can go back and forth to navigate files
  • Open files in vim one by one
    • Vim file1
    • After opening it you can type :e file2 .    This command will be used only to open one file in buffer at one time.   
      If you try to open more it will throw error. For ex:  :e file2 file3   
    • It will not load instantly in buffer.
    • You need to load it manually by browsing that file for the first time. Use command :b filename(now it will be loaded in buffer) ex:   :b file2
    • In vim v7 we can use :tabe filename too (to see filename in tab)
      :b filename (tab completion will not work in earlier version. In Vim7 it will work.)
    • set wildmenu  in your .vimrc profile to use enhanced tab completion while navigating files through buffer.
  • To know how many files have been opened and you are currently in which files
    •  use command :ls
    • Or : args   
    • or :ar to list file names
  • % refers to the file currently visible and # refers to the alternate file. (When you are using: ls to list files in buffer). You can easily toggle between these two files by pressing -shift-6
  • To Navigate files use following options:
    •  use :bn for next file in buffer :bp for previous file in buffer.
    •  Use :bn or :nb to browse nth file (n being a positive integer). :bn or :bnext is just an alias. You can use any one of them. Ex: 2b or b2 would open file which is at second buffer
    • :e filename - Edit a file in a new buffer
    • :bnext (or :bn) - go to next buffer
    • :bprev (of :bp) - go to previous buffer
    • :bd - delete a buffer (close a file)
    • :sp filename - Open a file in a new buffer and split window
    • ctrl+ws - Split windows (my vim gets hung, don’t know why). If you find the reason please let meknow. Ctrl+s doesn’t work in my vim editor under putty.
    • ctrl+ww - switch between windows
    • ctrl+wq - Quit a window
    • ctrl+wv - Split windows vertically
    • You can use :n also for browsing next file and :prev for previous file
  • By default vim will not allow you to switch to another buffer unless and until you save the current buffer.  It will thrown an error message like this. E37: No write since last change (add ! to override)

    So to avoid this just write set hidden in your .vimrc profile so that it will let you switch buffers even if you have unsaved changes in the one you are leaving. Use this option if you know what changes you have made. (Be careful).
  • You can use tab for multiple files in vim by using tabe filename (but only one file name will be allowed at one time). Then browse opened files in tab using gt (for next file) and gT (for previous file). Even if file is not saved you can move from one tab to other tab.
  • You can split your screen by entering the number with command sb instead of just b. ex: 2sb means split the current window with the second buffer at the top horizontally. And ctrl+w  o will bring back into single file edit mode
  • Use :ctrl+d to see the list of all available option under vim.
  • Use :menu to see available menu to use.

    I am still experimenting vim features. If I will come to know anything else apart from these features, I will update this post with latest stuff.

    If you know anything related to this topic or if you find any problem while using those commands, please revert here as comment with detailed issues.

Baca Selengkapnya ....

Meet the Raspberry Pi Supercomputer--with Lego!

Posted by Unknown Minggu, 16 September 2012 0 komentar
http://ostatic.com/blog/meet-the-raspberry-pi-supercomputer-with-lego


As we've noted, when it comes to the top open source stories of 2012, it's clear that one of the biggest is the proliferation of tiny, inexpensive Linux-based computers at some of the smallest form factors ever seen. And, the diminutive, credit card-sized Raspberry Pi, priced at $25 and $35, is one of the most widely followed of these miniature systems. People are putting all flavors of Linux and even Android on the tiny computers, and now news comes from the University of Southampton that Professor Simon Cox and his team of researchers have lashed together an actual supercomputer made of 64 credit card-sized Raspberry Pis using Lego pieces as the glue for the cluster.
Professor Cox said: “As soon as we were able to source sufficient Raspberry Pi computers we wanted to see if it was possible to link them together into a supercomputer. We installed and built all of the necessary software on the Pi starting from a standard Debian Wheezy system image and we have published a guide so you can build your own supercomputer.”
You can get the guide to making your own Raspberry Pi supercomputer here, and find more information on Cox's version here.
A quick glance at the instructions supplied by Cox and his team make clear that it's not hard to build one of these supercomputers, and the Lego casing is certainly very cool.
So what kind of power does this supercomputer pack? As The Register notes:
"The cheapo cluster has 1TB of storage, thanks to the 16GB SD card inserted into each board, and 16GB of RAM. Each Pi is connected by 100MBit Ethernet, and is powered by a Broadcom BCM2835 graphics chip that handily features a 700MHz ARMv6 processor core. he Debian GNU/Linux cluster runs off a single 13-amp mains plug, and uses the Message Passing Interface (MPI) protocol to manage the communications between each of the 64 nodes. Professor Cox wrote the control code in Python using Microsoft's Visual Studio."
The team from Southampton claims it built its supercomputer for under $5,000. Did you ever come up with that when you used to play with Lego blocks? Here's a gander at the lashup:


Photo Credits: University of Southampton and Professor Simon Cox 

Baca Selengkapnya ....

Do Your SSL Certs Meet Microsoft's New Requirements?

Posted by Unknown 0 komentar
https://www.linux.com/learn/tutorials/635016-do-your-ssl-certs-meet-microsofts-new-requirements-


Warning from Microsoft to the entire Internet: make sure that your digital certificates are at least 1024 bits. As of Oct. 9, 2012, longer key lengths are mandatory for all digital encryption certificates that touch Windows systems.
This means that Internet Explorer will refuse to access websites that do not have RSA keys with minimum lengths of 1024 bits. You won't be able to exchange encrypted emails, run ActiveX controls or install applications on Windows. This isn't new, as Microsoft started making announcements about this well over a year ago.
If your first reaction is "There goes Redmond bossing the rest of the world around again!", think about it. 1024-bits key length is already considered obsolete, so if you're hanging on to 1024-bit keys or weaker you're asking for trouble. The National Institute of Standards and Technology bulletin 800-57 recommends RSA key lengths of 2048 or 3072 bits. NIST calculates that 2048-bit keys will be good until 2030, and then they'll be easily breakable by brute force. 3072-bit keys have predicted lifetimes of "much longer." So 4096-bit RSA keys have lifetimes of "much, much longer."

Now What?

If you're running some Windows systems, start at RSA keys under 1024 bits are blocked. This tells you how to find weak keys and how to upgrade.
The rest of us must use other means. OpenSSL has a bunch of tools for querying SSL certificates. Use this invocation to get information on your local web server, and look for the following information:
$ openssl s_client -showcerts -connect localhost:443
Server certificate
subject=/OU=Domain Control Validated/OU=EssentialSSL Wildcard/CN=*.munge.com
issuer=/C=GB/ST=Greater Manchester/L=Salford/O=COMODO CA Limited/CN=EssentialSSL CA
---
New, TLSv1/SSLv3, Cipher is DHE-RSA-AES256-SHA
Server public key is 2048 bit
You may test remote servers as well, substituting their URLs for "localhost." The example shows that the server's SSL certificate is verified by a commercial certificate authority, Comodo, that it supports the latest strong protocols TLSv1/SSLv3, and uses the very strong AES256 symmetric encryption algorithm.
You can query a mailserver the same way:
$ openssl s_client -showcerts -connect mailserver:995
Or an FTP server:
$ openssl s_client -showcerts -connect ftpserver:21
You'll have to know how your FTP is configured, because it varies. FTP/SSL is usually TCP port 21 or 990, and SFTP is usually TCP port 115, though sometimes it goes over TCP port 22.

Algorithm Confusion

A common point of confusion is the various encryption algorithms used by OpenSSL. In the above example the RSA key is 2048 bits, but the AES key is only 256 bits. The RSA key relies on an asymmetric algorithm. It uses a pair of encryption keys, one public and one private. The public key encrypts and the private key decrypts. You can fling any number of public keys into the world so that other people may send you encrypted messages, and you only need to keep track of a single private key to decrypt them. It's a clever way to easily to set up encrypted communications.
Symmetric algorithms require that both parties share the same key for encryption and decryption. This has obvious drawbacks, like figuring out how to securely share the keys, and like any secret when more than one person knows it, it's no longer a secret. But symmetric algorithms are efficient and don't need much computing power.
A typical SSL session is a busy little thing with all kinds of stuff happening, and it takes advantage of the different strengths of asymmetric and symmetric algorithms. The asymmetric RSA key allows anyone to establish an encrypted network session without having a pre-shared key, but at the price of significant CPU cycles. Once the session is established, new symmetric keys are generated and exchanged to encrypt the remainder of the session.

How the Internet Sees You


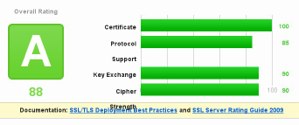
Qualys SSL tester
Figure 1: Qualys SSL tester.
I love websites that let you test your servers, and there are a lot of them. Qualys SSL Labs has an SSL server test. Test your server and you'll see a report like Figure 1.
It goes on to give detailed information like supported ciphers, RSA key strength, supported protocols, and it even says if it's vulnerable to the BEAST attack.

What the Web Browser Sees

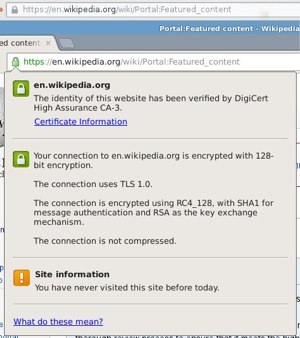
Web browser developers are getting stricter about the SSL information they display. In the olden days there was a little padlock at the bottom, and you clicked it to see the SSL information. Now they have multiple indicators. Chromium uses little colored padlocks, a plain page icon, and other indicators. Click on them to get full details.

Figure 2: How Wikipedia's SSL is reported by Firefox (top) and Chromium. Firefox is gray, Chromium is nice green.

Firefox is simpler and sterner. A gray globe indicates a mixed http/https page, a gray padlock is an https page, and only sites that pay mondo bucks for Extended Validation certificates get a green padlock. Firefox keeps changing their SSL indicators, so this could be outdated information tomorrow. For today, Figure 2 compares the same page in Firefox (on top) and Chromium. This page uses very strong encryption, but it still doesn't rate a splash of color in Firefox, just dull gray.

Upgrading Your Digital Certificates

I'm afraid I don't have a simple solution for querying or upgrading your digital certificates. Your upgrading method depends on whether your certificates are self-generated or from a commercial vendor, and how your public key infrastructure (PKI) is set up. How strong should you make them? You ought to do some testing before deciding, because the computational power required for higher encryption levels goes up steeply. So if you're thinking you'll, go for the gusto and use 4096-bit RSA keys and future-proof yourself forever, try it first and see how it affects server performance and user experience. The NIST thinks that 3072-bit keys should be good well beyond the predicted year 2030 lifespan of 2048-bit keys.
It's also a good time to check your own server configurations, and to limit who they'll accept connections from. The Apache Software Foundation has a great guide, Apache SSL/TLS Encryption that is useful not only for configuring Apache, but for understanding SSL/TLS.
Even though this is all a big pain, look at the bright side-- if you've been unsuccessfully trying to persuade your boss that you're years overdue to block SSLv1 and 40-bit symmetric keys, Microsoft might be doing you a favor.

Baca Selengkapnya ....

Basics of SELinux in Linux

Posted by Unknown Kamis, 13 September 2012 0 komentar
http://www.linuxnix.com/2012/09/basics-of-selinux-in-linux.html


Basics of SElinux

What is SELinux?
SELinux is a set of security policies/modules which are going to apply on the machine to improve the overall security of the machine. These are the Linux security modules(LSM) which are loaded in to kernel to improve security on accessing services/files which improve security. SELinux is short form of Security Enhanced Linux. SElinux is a security feature which was shipped with RHEL5, it is much secure than any other security such as PAM and Initd. Apparmor is some times consider as eloquent to SELinux. Below is the security model in Linux.

Setting of SELinux

SELinux is set in three modes.
  • Enforcing - SELinux security policy is enforced. IF this is set SELinux is enabled and will try to enforce the SELinux policies strictly
  • Permissive – SELinux prints warnings instead of enforcing. This setting will just give warning when any SELinux policy setting is breached
  • Disabled – No SELinux policy is loaded. This will totally disable SELinux policies.

And SELinux is set in two levels
  • Targeted – Targeted processes are protected,
  • Mls - Multi Level Security protection.

Get SELinux Status

Example1:Is SELinux enabled or not on your box? use below command to get the status.
#getenforce

The output will be either “Enabled” or “Disabled”
Example2: To see SELinux status in simplified way you can use sestatus

#sestatus
Sample output:
SElinux status : enabled
SELinux mount : /selinux
Current mode : enforcing
Mode from config file : enforcing
Policy version : 21
Policy from config file : targeted
From the above output we can see that SElinux is enabled and it is in enforced mode.
and to see detailed status you can use -b option, this will give on which services SElinux is enabled and which services are disabled.
Example3:To get elobrated info on difference status of SELinux on different services use -b option along sestatus
#sestatus -b
Sample output:
[root@centos1 ~]# sestatus -b
SELinux status: enabled
SELinuxfs mount: /selinux
Current mode: permissive
Mode from config file: enforcing
Policy version: 24
Policy from config file: targeted
Policy booleans:
abrt_anon_write off
allow_console_login on
allow_corosync_rw_tmpfs off
allow_cvs_read_shadow off
allow_daemons_dump_core on
allow_daemons_use_tty on
allow_domain_fd_use on
allow_execheap off
allow_execmem on
allow_execmod on
allow_execstack on
allow_ftpd_anon_write off
==Cliped the output here==

Disabling SELinux

Example4:How to disable SElinux
We can do it in two ways
1)Permanent way : edit /etc/selinux/config
change the status of SELINUX from enforcing to disabled
SELINUX=enforcing
to
SELINUX=disabled
Save the file and exit.
2)Temporary way : Execute below command
echo 0 > /selinux/enforce
or
setenforce 0

Enabling SELinux

Example5:How about enabling SELinux
1)Permanent way : edit /etc/selinux/config
change the status of SELINUX from disabled to enforcing
SELINUX=disabled
to
SELINUX=enforcing
Save the file and exit.
2)Temporary way : Execute below command
echo 1 > /selinux/enforce
or
setenforce 1

Baca Selengkapnya ....
Trik SEO Terbaru support Online Shop Baju Wanita - Original design by Bamz | Copyright of android japan.