No peace for mobile environment that due its impressive increase is attracting cyber criminals and hackers like never before.
The researcher Atul Alex has presented at last edition of International Malware Conference (MalCon) how it is possible to attack every mobile devices with a special hardware designed using common electronic components.
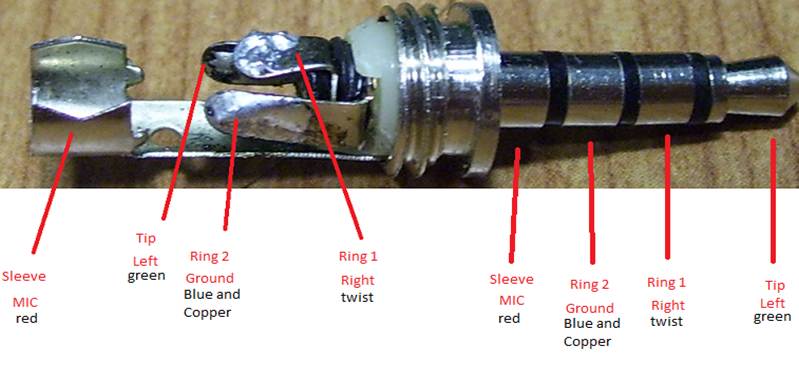
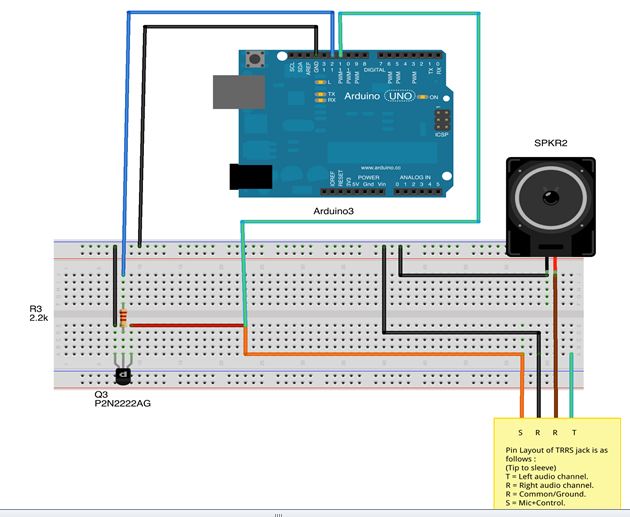
Atul Alex presented a paper that covers “abusing voice dialing and combining Arduino / Microcontroller to steal private data on iphone, Android, Windows Phone and Blackberry using only the Audio jack.
Mobile devices are sophisticated devices that manage a huge quantity user’s information and their exploit could open the door to a mine of sensible data, due this reason the expert provides that in incoming months defense system will be reinforced and it will be more difficult in the future software based attacks.
It must be considered that an efficient attack on large scale against mobile world have to be able to infect multi platform devices.
During its presentation Atul Alex explained how to transform any mobile device into a spy tool, avoiding the installation of any malicious software on it, abusing voice dialing feature which is enabled by default on all mobile platforms.
Modern devices are equipped with powerful software able to interpret user’s vocal commands, the hardware device proposed by Alex Atul is able to mimic them to give orders to the device. The functionality opens future scenarios in which hackers are able to control phone simply sending unauthorized text messages to steal sensible data.
Almost all events on the mobile are notified to the user with the help of corresponding tones/sounds, the researched has demonstrated that adding a microcontroller to the headset’s circuit is possible to:
Initiate phone calls without user interaction.
Note duration of phone calls.
Detect incoming/outgoing calls, sms & so on.
In the future versions the hardware could also integrate more complex functionalities such as recording of phone calls or remote activation of the device.
For sure similar devices will represent in the future a privileged option for cyber espionage operations and more in general for cyber operations. Many governments are working or financing projects for development of new cyber tools. Government agencies have massively invested in programs to “violate” citizen’s privacy in the name of national security, world is changed from 11/9 and the risk of a new dramatic cyber attack is high.
The Defense Advanced Research Projects Agency (DARPA) is one of the most advanced agency in this sense, it is responsible for the development of new technologies for use by the military and recently it has proposed a device called thePower Pwn designed by Pwnie Express company that apparently look like a surge protector, but it’s a powerful tool to infiltrate networks allowing remote access to every machine.
How to defend our device from similar attacks? In the future every interface of mobile device have to be properly designed, every input must be validated by a specially designed circuitry.
Another factor to consider as critical is the qualification of hardware for devices similar to the one described in the research , different compromised components may invade the consumer market with disastrous consequences, it is necessary a great effort to avoid dangerous incidents.
If you're starting a new open source project, or open sourcing some existing code, you'll need a publicly accessible location for the version control system holding your code (if you're not planning on setting up a publicly accessible VCS, reconsider; no public source control is a red flag to potential contributors). You could set up your own repository hosting, but with so many companies and groups offering existing setups and services, why not use one of those and save yourself some time? Here's an overview of some of the more popular options.
SourceForge
The granddaddy of code hosting sites, SourceForge has been around since 1999. It offers support for every popular revision control system, from CVS on up to Git. Most modern code hosting services are tightly integrated experiences, presenting a single UI with source code browsing, issue tracking, wikis, etc. While SourceForge is moving in this direction, they still keep some of their old kitchen sink philosophy, allowing projects to run phpBB forums, Wordpress blogs, or anything else they might want.
GitHub
While still young compared to SourceForge, GitHub has become the de facto host for open source projects, with over 4.2 million repositories at the time of writing. GitHub's strength is their tagline, 'Social Coding'. On GitHub, it's trivial to make a copy of another developer's project, make changes to that project, and then submit those changes using GitHub's pull request system. Given the number of developers already on GitHub, and how easy it makes submitting contributions, if you're starting a new open source project and hoping for community contributions, use GitHub. Unless you don't like Git.
Google Code
Google Code Project Hosting is one of the most minimal code hosting options available, which may be appealing to anyone who already has their own infrastructure setup. In addition to offering Subversion, Mercurial, or Git repository hosting, Google Code provides wikis and simple issue tracking. The interface design is sparse, and does not provide the social hooks seen throughout GitHub.
Gitorious
Gitorious is noteworthy for being one of the few open source code hosting repositories that's actually open source itself. You're free to download and run the software yourself, or take advantage of their public hosting. They offer Git hosting, wikis, and a merge request system for community contributions (though the interface seems clunkier than the high mark set by GitHub).
Bitbucket
Just as Git was squaring off against Mercurial for distributed version control dominance, GitHub was facing Bitbucket. Bitbucket began as a Mercurial only hosting service, but a year after its acquisition by Atlassian, it began offering Git support as well. Bitbucket is very similar to Github. It offers pull requests, a highly visible fork button on each repository, issues, and wikis. One thing Bitbucket does offer that Github does not is unlimited private repositories. If you want to store your family's secret chocolate chip cookie recipe, Bitbucket will let you do it for free (you'll only need to pay after sharing the recipe with five other family members). There are many more sites that provide free hosting. I've focused on a few of my favorites (this comparison is also avaliable on Github). If you're looking for something special (perhaps GNU Arch support?), or if you're just curious to see all the options, Wikipedia has a great comparison table.
I am using a bash shell under Ubuntu Linux operating system. Sometime I need to restrict my own Internet bandwidth for all my shell applications such as ftp, sftp, wget, curl and friends. How do I limit the network speed under bash without setting up a complicated firewall and tc rules as described here?
You need to use a portable lightweight userspace bandwidth shaper called trickle. It can run in in collaborative mode or in stand alone mode. trickle works by taking advantage of the unix loader preloading.
Essentially it provides, to the application, a new version of the functionality that is required to send and receive data through sockets. It then limits traffic based on delaying the sending and receiving of data over a socket. trickle runs entirely in userspace and does not require root access.
Reading package lists... Done
Building dependency tree
Reading state information... Done
The following NEW packages will be installed:
  trickle
0 upgraded, 1 newly installed, 0 to remove and 20 not upgraded.
Need to get 43.0 kB of archives.
After this operation, 180 kB of additional disk space will be used.
Get:1 http://debian.osuosl.org/debian/ squeeze/main trickle amd64 1.07-9 [43.0 kB]
Fetched 43.0 kB in 1s (30.6 kB/s)
Selecting previously deselected package trickle.
(Reading database ... 280975 files and directories currently installed.)
Unpacking trickle (from .../trickle_1.07-9_amd64.deb) ...
Processing triggers for man-db ...
Setting up trickle (1.07-9) ...
Install trickle under CentOS / RHEL / Fedora Linux
Loaded plugins: auto-update-debuginfo, protectbase, rhnplugin
0 packages excluded due to repository protections
Setting up Install Process
Resolving Dependencies
--> Running transaction check
---> Package trickle.x86_64 0:1.07-9.el6 will be installed
--> Finished Dependency Resolution
Dependencies Resolved
=============================================================
 Package      Arch        Version            Repository
                                                        Size
=============================================================
Installing:
 trickle      x86_64      1.07-9.el6         epel       41 k
Transaction Summary
=============================================================
Install       1 Package(s)
Total download size: 41 k
Installed size: 89 k
Is this ok [y/N]: y
Downloading Packages:
trickle-1.07-9.el6.x86_64.rpm         |  41 kB     00:00
Running rpm_check_debug
Running Transaction Test
Transaction Test Succeeded
Running Transaction
  Installing : trickle-1.07-9.el6.x86_64                 1/1
  Verifying  : trickle-1.07-9.el6.x86_64                 1/1
Installed:
  trickle.x86_64 0:1.07-9.el6
Complete!
How do I use trickle?
The syntax is:
trickle -u uploadLimit program
trickle -d downloadLimit program
trickle -u {UPLOAD_LIMIT} -d {DOWNLOAD_LIMIT} program-binary
Examples
Start ftp client limiting its upload capacity to 100 KB/s: trickle -u 100 ftp Start ftp client limiting its download capacity at 50 KB/s: trickle -d 50 ftp You can combine both options: trickle -u 100 -d 50 ftp You can pass other args to the ftp command: trickle -u 100 -d 50 ftp ftp.cyberciti.biz trickle -u 100 -d 50 ftp ftp.cyberciti.biz 8021 Use the wget command to download an iso file from openbsd.org ftp server: $ wget http://ftp.openbsd.org/pub/OpenBSD/5.2/i386/install52.iso Sample outputs:
Now, use trickle to download iso file but limit capacity at 50 KB/s: trickle -d 50 wget http://ftp.openbsd.org/pub/OpenBSD/5.2/i386/install52.iso Sample outputs:
trickle: Could not reach trickled, working independently: No such file or directory
--2012-12-04 16:00:32--  http://ftp.openbsd.org/pub/OpenBSD/5.2/i386/install52.iso
Resolving ftp.openbsd.org... 129.128.5.191
Connecting to ftp.openbsd.org|129.128.5.191|:80... connected.
HTTP request sent, awaiting response... 200 OK
Length: 237457408 (226M) [text/plain]
Saving to: `install52.iso.2'
 0% [                    ] 2,45,760    49.9K/s  eta 77m 22s
Limit bandwidth in a single shell for all commands
Launch bash or ksh shell limiting its upload capacity to 250 KB/s, and download capacity at 500 KB/s: trickle -d 500 -u 250 bash OR trickle -d 500 -u 250 ksh Now, for all programs launched inside currently running bash or ksh shell will follow bandwidth shaper rules: wget http://example.com/foo.iso sftp file.mp4 user@server1.cyberciti.biz:~/Downloads/
Other options
From the man page:
 -h           Help (this)
 -v           Increase verbosity level
 -V           Print trickle version
 -s           Run trickle in standalone mode independent of trickled
 -d     Set maximum cumulative download rate to  KB/s
 -u     Set maximum cumulative upload rate to  KB/s
 -w   Set window length to  KB
 -t  Set default smoothing time to  s
 -l   Set default smoothing length to  KB
 -n     Use trickled socket name
 -L       Set latency to  milliseconds
In a GNU/Linux system every file or folder has some access permissions. There are three types of permissions (what allowed to do with a file of any kind, directory included): (r)read access (w)write access (e)execute access There are also other “special” permissions, but for this article the basic permissions will be enough to illustrate how umask works, and the permissions are defined for three types of users: (U) the owner of the file (G) the group that the owner belongs to (O) All the other users umask (user mask) is a command and a function in POSIX environments that sets the file mode creation mask of the current process which limits the permission modes for files and directories created by the process. A process may change the file mode creation mask with umask and the new value is inherited by child processes. In practice with umask you can define the permissions of the new files that your process will create.
The user mask contains the octal values of the permissions you want to set for all the new files and to calculate the value of the umask subtract the value of the permissions you want to get from 666 (for a file) or 777 (for a directory). The remainder is the value to use with the umask command. For example, suppose you want to change the default mode for files to 664 (rw-rw-r–). The difference between 666 and 664 is 002, which is the value you would use as an argument to the umask command. Or just use this handy table
umask Octal Value
File Permissions
Directory Permissions
0
rw-
rwx
1
rw-
rw-
2
r--
r-x
3
r--
r--
4
-w-
-wx
5
-w-
-w-
6
--x
--x
7
--- (none)
--- (none)
In this article I’ll show you in practice how to use umask to change the permissions of the new files:, so open a terminal and follow me in this small list of commands and examples
1) Check your permissions
Let’s create a file in /tmp
cd/tmp touch firstfile ls-l firstfile
You’ll have an output like this one:
-rw-r--r-- 1 root root 0 Dec 3 23:34 firstfile
That’s a default, as you can see, looking from the left, the user that has created the file (root for me) can read and write the file, the group (root) can only read it and all the others can read the file, that’s the standard umask with a value of 0022, to check the umask that you are using in a terminal you can issue the command umask without any argument.
root@myserv:/tmp# umask
0022
2) Change the default umask
So now we know that the umask is 0022 that produces files with the -rw-r–r– permissions, but in many cases you want to give to your colleagues the write permission to directory and files that you create, so to calculate the new umask we translate the permissions -rw-rw-r– in their octal representation, that is: 664 and subtract this number from 666, the result is the umask you want to set in your shell:
Sometimes you have processes and daemons that create files, and you want to manage the permissions of these files, a typical example that comes to my mind is an apache httpd server that creates files with uploads or with some scripts and once they are created you want to modify these files with your username that shares the same group of apache, how to do it ? In general you have to put the command umask in the script that is used to start the daemon or in files included in the start, so for apache this could be /etc/init.d/apache2 (debian) or much better in the environment file that is included, /etc/apache2/envvars (debian) So you could set your umask in /etc/apache2/envvars :
...
# umask 002 to create files with 0664 and folders with 0775
umask 002
Restart your Apache :
/etc/init.d/apache2 restart
And now if you check the difference in your document root, you should see something like this :
So now you know how to change the umask in a working terminal, or session, but how to change it permanently ? To change the umask for just an user the easiest way is to set the command umask NEWUMASK in the ~/.bashrc file of that user (assuming that he’s using bash) or in the equivalent file that is loaded at the start of his session by his shell. To change the umask for all your users you have to change some system setting and these depends on your Linux Distribution: Debian 6, Ubuntu and Mint
In Debian this can be handled with the help of a PAM modules, pam_umask is a PAM module to set the file mode creation mask of the current environment. The umask affects the default permissions assigned to newly created files, to enable/change these permissions edit the files:
In this way all sessions will use the 0002 umask giving to the group the permission to write to files and directories. Red Hat 6 and Centos 6
In these distributions the generic umask is wrote in the file /etc/bashrc, if you open it (as root) and you search for the word “umask” you’ll find something similar to these lines:
# By default, we want umask to get set. This sets it for non-login shell. # Current threshold for system reserved uid/gids is 200 # You could check uidgid reservation validity in # /usr/share/doc/setup-*/uidgid file if[$UID-gt 199 ]&&["`id -gn`" = "`id -un`"]; then umask 002 else umask 022 fi
These lines set an umask of 002 for all the username whose uid is greater than 199 and the group name is the same of the user name. So to change the umask for everyone you could simply change all these lines in this line:
You've set up your Raspberry Pi using our easy to follow instructions. You've had a gander at our 25 top fun things to do and now you fancy something a bit more involved. How about making a solar-powered FTP server? You'll always have instant access to all your digital files, from anywhere with an Internet connection, and it won't cost a penny on your electricity bill.
Ordering the sun bed
We'll be using a simple custom-built £25 Raspberry Pi case, with all the right slots for its outputs, that comes with a small solar panel, a battery case and a micro-USB cable. You'll just need to supply your own NiMH rechargeable batteries. Point your browser over here -- you'll find all the information you need to place an order via PayPal. The maker, Cottonpickers, has an eBay page as well if you're more comfortable making your purchase that way.
Static IP address
Once it's plopped through your letterbox, slot your Pi into the case and hook it up to power and a monitor. Let's start programming. The first step is to make sure the RPi has a static IP address, as we're going to have to poke a hole through our network firewall to allow incoming FTP requests. In the RPi desktop, double-click the 'LX Terminal' icon to drop into the Terminal. To setup a static IP address, type the following: sudo nano /etc/network/interfaces This file controls the IP addressing for the RPi. All you need to do is scroll down slightly to the 'iface eth0' line and remove 'DHCP' and replace it with 'static'. Now, on the line directly below, enter an IP address for your RPi, along with the subnet mask and gateway. Our example looked like this, but yours will be dependent on your home network: address 192.168.1.93 netmask 255.255.255.0 gateway 192.168.1.254 Assuming you don't know these already, you can find your IP address and router settings by consulting your router documentation, or by typing the following into a Terminal on the RPi: ifconfig -a. This will list the current IP address, netmask and gateway as configured by the router's DHCP. All you need to do then is enter the IP address and so on into the 'static' section of the file to make sure the RPi will forever boot with that unique IP addess. After you've entered the details, exit by pressing Ctrl+X to exit, followed by 'Y' to accept the changes, then press Enter a couple of times to get to the command line. Now type: sudo /etc/init.d/networking stop sudo /etc/init.d/networking start This will restart the networking components with the new IP address in place.
VNC
From the Terminal type the following, pressing Enter after each line: sudo apt-get update sudo apt-get install vnc-server vncserver When the packages have downloaded and installed, follow the instructions on-screen to setup a password, and confirm it, but answer 'No' to the view-only option. Now that VNC is installed, we need to make sure it loads up as a service every time the RPi reboots. To do this, from the Terminal type: sudo nano /etc/init.d/tightvncserver, and press enter In the editor, type the following: #!/bin/sh # /etc/init.d/tightvncserver # Set the VNCUSER variable to the name of the user to start tightvncserver under VNCUSER='pi' case "$1" in start) su $VNCUSER -c '/usr/bin/tightvncserver :1' echo "Starting TightVNC server for $VNCUSER " ;; stop) pkill Xtightvnc echo "Tightvncserver stopped" ;; *) echo "Usage: /etc/init.d/tightvncserver {start|stop}" exit 1 ;; esac exit 0 Now press 'Ctrl+X', then 'Y' to save, followed by 'Enter' a couple of times to get you back into the Terminal. What we need to do now is edit the permissions of the script we've just created so that it's executable, do this by typing in: sudo chmod 755 /etc/init.d/tightvncserver, and press Enter. Finally, we need to add it to the start-up scripts, by typing: update-rc.d tightvncserver defaults, and press Enter. What you can do now is unplug the RPi from your monitor and locate it somewhere that has easy access to a network cable, and plenty of sunlight (for the solar cells). If you install the likes of TightVNC Viewer you should be able to point the client to '192.168.1.93:1' (or whatever your static IP address is) and have full access to the RPi and the GUI.
VSFTPD
This next part involves setting up the FTP server itself. Again it's not too difficult, and can be configured to your exact preferences later on. From the Terminal, type the following: sudo apt-get install vsftpd, and press Enter. Once the VSFTPD (which stands for Very Secure FTP Daemon) packages have downloaded and installed, type: sudo nano /etc/vsftpd.conf, and press Enter. This is the configuration file and control for VSFTPD, it allows you to set all sorts of restrictions and policies, so some care is advised. To start with though, we would recommend altering the following lines within the script, either by un-hashing, or typing in 'YES' or 'NO': Anonymous_enable=NO Write_enable=YES Local_enable=YES Ascii_upload_enable=YES Ascii_download_enable=YES The full explanation can be found within the hashed comments in the script itself, but they will suffice for our little project for now. When ready, rave the changes to the script as before. Finally, reboot the RPi to bring everything you've done so far into effect. To do this, make sure you're in the Terminal, and type: sudo reboot, and press Enter.
Access external hard drive via FTP
We like to make things easy, so here's our method of accessing an external hard drive attached to one of the RPi's USB ports, via an FTP client. First, you can hook up an external USB drive to your PC and format it as NTFS, with the volume labelled FTP. When that's complete, plug it in to the RPi and via VNC click 'Yes' to view the drive from within the File Manager. Make a note of the address of the hard drive -- in our case it came out as /media/FTP. To test FTP access, install an FTP client such as FileZilla and enter the connection details: 192.168.1.93/media/FTP, replacing the IP address with your own static RPi address. Username: pi, replace this with the username you set VSFTPD with (default is pi). Password: raspberry, replace this with user's password (if other than pi). With luck, you should now have access to the external USB hard drive, via FTP, internal to your own network.
External access
The final part of this project involves granting external FTP access to the RPi. This is also the most ambiguous of the steps, as it all depends on the make and model of your router. For example, on the basic BT model I used it's a simple case of selecting FTP from the pre-defined applications, and assigning it to the internal IP address of the Raspberry Pi. Yours may be completely different, however. That being the case, please consult your router's documentation, or Google the model and see if there's already an FTP external access tutorial out there.
Many people thinks that RegExp is alian to Bash/KSH Scripting and depends on GREP or SED to use regexp extensively. But from Version 3 of Bash we can use regular expression with out using grep or sed. This will save us lot of time and reduce number of lines of script we write.
Lets take some example, I want to ask a user to enter "Yes" to do some activity depending on his input. He may end up with entering YES or Yes or YEs or some other form of YES or even just Y or y.
Earlier versions of BASH and KSH we have to depend on grep to put a check on user's different inputs as shown below code.
read option1 echo $option1 | grep -E '[Yy][Ee][Ss]|[Yy]' if [[ "$?" -eq 0 ]] then echo "Do some thing" else echo "Do other thing" fi
output: Do Some thing
If you see above code we are using 3 commands(echo, grep and if statement) to accomplish our task.
Which will use system resources a bit more when we can accomplish with a just BASH/KSH alone.
From BASH version 3 there is an inbuilt regex operator( =~ ) which will help us to solve this problem
If you are new to regular expressions please click here
Below are the types of regular expressions we have and we will go with each and every regexp with an example.
Basic Regular expressions
^ --Caret symbol, Match beginning of the line/Variable. $ --Match End of the line/variable. . --Match Any single character. * -- Match 0 or more occurrence of previous character(This is bit tricky). [] – Match Range of characters, just single occurrence. [a-z] –Match small letters [A-Z] –Match cap letters
[0-9] – Match numerical. [^] – Match Negate a sequence of char followed by ^. \ -- Match Escape character, for matching special chars like ., * etc.
Extended Regular expressions
{n} --Match number of occurrence of a character {n,m} --Match a character which is repeated n to m times. {n,} --Match a repeated character which is repeated n or more times. + --Match one or more occurrences of previous character. ? – Match 0 or 1 occurrence of previous character. -- Match Either character () –match a group of characters
Let us start with an example
I have a variable var1 whose value is "abbbcd acdef 123 acd cda2". And we are going to use same variable for below examples.
Example1: Check var1 start with "a" or not
if [[ "$var1" =~ ^a ]] then echo "Yes, it start with a" else echo "It does not start with a" fi
Output:
Yes, it start with a
Note: Dont give quotes around regexp, Your bash/ksh will take care of that.
Example2: Check if var1 ends with 2 or not
if [[ "$var1" =~ 2$ ]] then echo "Yes, its end with 2" else echo "It does not end with 2" fi
Output:
Yes, it end with 2
Example3: Check if var1 have string which start with a and ends with d and should contain only 1 letter between them.
if [[ "$var1" =~ a.d ]] then echo "Yes, its present" else echo "It not there" fi
Output:
Yes, its present
Example4: Check if var1 have a string which have may contain's 0 or more times of b
if [[ "$var1" =~ b* ]] then echo "Yes, its true" else echo "It not there" fi
Output:
Yes, its true.
Note:The output of this script is always true because it we can have var1 with b's and with out b's. We have to depend on + for a meaning full checking like at-least 1 b occurrence.
Example5: Check if var1 contain contains either abc or adc word in it.
if [[ "$var1" =~ a[bd]c ]] then echo "Yes, its present" else echo "It not there" fi
Output: Yes, its present This will match either abc or adc and gives the output as it present.
Example6: Check if var1 contains abc or bbc or cbc or dbc to zbc
if [[ "$var1" =~ [a-z]bc ]] then echo "Yes, its present" else echo "It not there" fi
Output:
Yes, its present
I will leave [A-Z] and [0-9] option to reader it self. Explore your self on this.
Example7: Check if var1 do not contain z in it
if [[ "$var1" =~ [^z] ]] then echo "Its not there" else echo "z is present" fi
Output:
Its not there
Example8: Check if a string "123 acd" is present in var1 or not
if [[ "$var1" =~ 123\ acd ]] then echo "Yes, its present" else echo "its not present" fi
Note: If you observe regexp, We did not used quotes, your bash/ksh will take care of it.
Output: Yes, its present.
Example9: Check if var1 contain a string which have 2 b's in between a and cd.
if [[ "$var1" =~ ab{2}cd ]] then echo "Yes, its present" else echo "its not present" fi
the output will be "Its not present" because our var1 variable(abbbcd acdef 123 acd cda2) have 3 b's between a nd cd.
Example10: Check if var1 contain a string which have 2 or 3 b's between a and cd.
if [[ "$var1" =~ ab{2,3}cd ]] then echo "Yes, its present" else echo "its not present" fi
The output will be "Yes, Its present", because it try to match abbbcd in the string, if one matches.
Example11: Check if var1 contain a string which have 2 or more b's between a and cd.
if [[ "$var1" =~ ab{2,}cd ]] then echo "Yes, its present" else echo "its not present" fi
Output:
Yes, its present
Example12: Check if var1 contain 1 or more b's between a and cd
if [[ "$var1" =~ ab+cd ]] then echo "Yes, its present" else echo "its not present" fi
Output:
Yes, its present
Example13: Check if var1 contain 0 or 1 b between a and cd
if [[ "$var1" =~ ab?cd ]] then echo "Yes, its present" else echo "its not present" fi
Output:
Yes, its present
Example14: Check if var1 contain either acdef or acd in it?
if [[ "$var1" =~ acdef|acd ]] then echo "Yes, its present" else echo "its not present" fi
If either one of acdef or acd is there, if loop will be true.
Example15: Check if var1 contain abbbcd or acd in it. We can combain the letters which are common in both the words with () and
if [[ "$var1" =~ a(bbbc|c)d ]] then echo "Yes, its present" else echo "its not present" fi
Output:
Yes, its present
if you want to make this more simple you can write the above regexp as below.
if [[ "$var1" =~ a(bbb|)cd ]] then echo "Yes, its present" else echo "its not present" fi
Now come back to our old code on getting user input of Yes with out using echo and grep commands..
echo $result | grep -E '[Yy][Ee][Ss]|[Yy]' if [[ "$?" -eq 0 ]] then echo "Do some thing" else echo "Do other thing" fi
The above code can be written as
if [[ "$var1" =~ ([Yy]|([Ee][Ss])) ]] then echo "Yes, its present" else echo "its not present" fi
So that user can type Y or y or yes or Yes or YEs or YES or YeS or yEs or yES or yeS. All these things will be matched.
Keep visiting us to get more update on Shell scripting.
There are lots of systems and utilities available to monitor your system. Many of these are web-based, or they run as a client-server system. Unfortunately, there are several instances where the only allowed connection to the server of interest is over SSH. This might be for several reasons, the least of which being security. In these cases, you will likely still want some way of easily monitoring what is going on with your server. Using tmux, you can create a session which will run all of your monitoring software and keep it running, regardless of whether you lose your connection or not. This article will cover the basics of creating such a session, which you should be able to tune and tweak to fit your specific requirements. This way, you can simply log in using any available SSH connection and see, in an instant, all of the information that is of interest to you. Also, since you need to log into the system over SSH, you don’t need to worry about the problems of locking down other software, such as a web server. You can monitor a lot of processes and logs with tmux
Getting tmux Tmux originated as part of the OpenBSD system. It should be available in most distributions. For example, you can get it in Ubuntu with ‘sudo apt-get install tmux’. If you need the latest and greatest features, you can download the source code from SourceForge.
Step 02
Building tmux The build system uses the usual ‘./configure; make; make install’ steps to build tmux. The reason you may want to build your own is that many distributions are behind one or more versions on the software provided by their respective repositories.
Step 03
Starting tmux Starting tmux is as simple as typing ‘tmux’ and hitting Enter. Your console will clear for a split second, and then you will be presented with a Bash prompt again, along with a status bar located at the bottom of your screen. This status bar will contain information about your current tmux session.
Step 04
Starting top – CPU sorted One of the things you will be interested in monitoring is which processes are using up the most CPU cycles on your server. A good tool for this is ‘top’. The default when you first start it is to sort processes based on CPU usage, so that is fine.
Step 05
Getting a new window Here we come to one of the features of tmux; we need to create a new window in this tmux session. There are two ways to handle this: first, you can use the shortcut ‘C-b c’, or you can enter the complete command ‘new-window’. To enter commands, you need to enter ‘C-b :’ and then the command. This will put your current window into the background and open a new window in the foreground.
Step 06
Starting top – memory sorted
With a new window, you can start a new instance of top, sorting it on some other criteria. One of interest to most system administrators is which processes are using up memory. To sort the processes in this way, you will need to enter ‘M’. This may vary for other versions of top, so always check your version’s man page. You might also want to change the refresh rate by entering ‘d’ and setting the number seconds between each display.
Steo 07
Navigating windows Now that you have multiple windows, you need to be able to navigate between them. The simplest way is to use the shortcut navigation keys. To move to a specific window, you can use ‘C-b’ and then the window number. Remember that window numbering starts at 0. If you simply want to move to the next or previous window, use ‘C-b n’ or ‘C-b p’.
Step 08
Creating new panes The next great feature of tmux is the ability to break up windows into panes. This lets you have multiple programs running in the same window. To split the current pane horizontally, use ‘C-b %’ to get two panes, left and right. If you wish to split the current pane vertically, you would use ‘C-b “’.
Step 09
Navigating panes Once you end up with multiple panes, you need to be able to navigate them. To move to the next pane in the current window, you would use the shortcut ‘C-b o’. You can also rearrange panes within a window. To swap the current pane with the previous pane, use the ‘C-b {’ keyboard shortcut. To do so with the next pane, use ‘C-b }’.
Step 10
Using tail Now that you have tmux essentials under your belt, it’s time to add some systems monitoring. You’ll want to monitor system logs, and you can do so in multiple panes, giving you an overall view. For example, navigate to an empty pane and enter:
tail -f /var/log/syslog
…in order to get a continually updating view of system messages.
Step 11
Following dmesg Kernel messages can be followed by using the program dmesg. The problem is that it doesn’t do automatic refreshing. You can accomplish this with ‘watch -n 3 “dmesg | tail -n 15” ’, where the 3 is the number of seconds between refreshes, and the 15 is the number of lines to display.
Step 12
Network statistics The next area you will want to monitor is networking. One utility you can use is netstat. To see all of the current connections on your server, you can use ‘netstat -at | grep -v LISTEN’. This is non-refreshing, so again you will likely want to pass it to watch in order to get an updating output.
With tmux, you can create a monitoring system allowing you to check on your server remotely and get the perfect overview of what’s happening. Joey Bernard explains how…
Disconnecting tmux The next powerful feature of tmux is the ability to take your session and detach it from the console that you are currently using. To do this, you can use the shortcut key ‘C-b d’. This puts tmux into the background, allowing you to logout of the server if you wish. The great thing is this also works if your connection simply dies, too.
Step 14
Reconnecting tmux Now that you have a tmux session set up that is monitoring all of the parts of your server that you are interested in, you may want to check in on it. You can log into your server and simply reattach to the existing tmux session with ‘tmux attach-session’.
Step 15
Byobu There is an alternative program available called Byobu. This program is actually a wrapper around both tmux and screen. It provides a prettier interface to tmux, including a more detailed, two-line status bar at the bottom of the screen. This improved status bar will give you more information, like battery level, CPU frequency and temperature, and even whether there are updates available for your system. These extras are all configurable, and there is even the option of creating a custom notification. You should consider checking Byobu out as a ‘tmux+’ option for your monitoring setup.
Step 16
Naming windows Once you have your monitoring windows set up, you will likely want to name them so that they are easier to manage. You can do so with the ‘C-b ,’ shortcut. This will rename the current window, and this new name will appear in the list at the bottom of the screen.
Step 17
Configuration files All of the commands you have used so far to create your monitoring session manually can be done automatically through the use of a configuration file. Each of the shortcuts has an equivalent long command which can be used in the configuration file.
Step 18
Creating windows To create a new window, you need to add the line ‘new-window’ to the configuration file. When you create this new window, you can give it a target of a current window whose index is where your new window will be inserted.
Step 19
Starting top Another important option to the ‘new- window’ command is a shell command to execute upon launching the new window. This is where you would place the command to start up ‘top’ within your new window.
Step 20
Naming windows Naming windows is done through the option ‘-n NAME’. This is important as it makes managing the windows easier. This name gets used to label the window, and it also gets used when you target a window with some particular command through the ‘-t TARGET’ option.
Step 21
Creating panes To create a pane, you will need to know which window you want to do so in. You can use the ‘split-window’ command, with either the ‘-h’ option for horizontal splitting or ‘-v’ for vertical splitting. Panes are identified through their 0-based index in the current window.
Step 22
Starting tail in a pane To start up a program in your new pane, you can add the command to the end of your ‘split-window’ tmux command. You can change this at runtime with the tmux command ‘respawn-pane -k -t TARGET-PANE command’, which will kill the current process and start up your new one.
Step 23
Loading a configuration file After all of this work, you should have a configuration file that will load your entire monitoring session. To do so, you can save it to the default filename ‘~/.tmux.conf’, or you can save it to another filename and load it with ‘tmux -f filename’.
Step 24
What else can you do? This has only been a start. You can take this and add your own monitoring programs to your tmux session to help in your system administrator duties. You can now connect to your system on a whim and see what is going on in a matter of moments.