Free Android Apps: 59 Good Apps

Posted by Unknown Kamis, 19 April 2012 0 komentar

The explosion of the Android mobile platform has developers competing for attention and downloads in crowded apps markets. The result? You can download a ton of really useful software for free, if you’re willing to put up with the occasional advertisement or upsell to a premium version of the app.
These are 60 free Android apps we find useful. Some of them are extremely powerful, some of them are ingeniously simple, and a couple of them are actually just for fun. But they are all certainly worth a look.
1) Easy Battery Saver

Easy Battery Saver
Easy Battery Saver
2Easy Team: Smartphones drink electricity, and this app is among the better ones designed to help you at least make it past dinner with a functioning communication device in your pocket. Energy use plans include options to smartly shut down antennae when networks are out of range and to save only key data, such as your texts. You also get detailed energy consumption reports.
2) Handcent SMS
Handcent Market:Integrated spell-checking, privacy controls like hiding messages in all your tools, and group sending options to let you pump out more than 1,000 messages an hour – all these features are available in this popular SMS power app. You can also fully customize your messaging interface, even making it look like really cool phones like the Blur or the iPhone.
3) Antivirus Free
AVG Mobilation: This free AV suite includes the basic app and files scanning you'd expect in any security tool. It also supports device pinpointing via Google Maps, the ability to remotely lock or wipe a lost phone, and a built-in task killer to improve device performance. It even has a battery optimization feature, if you don't want to devote a whole app to that function. A surprisingly feature-rich freebie.
4) MP3 Ringtone Maker
LuckyStar: This app has one of the more intuitive interfaces for the all-important task of assigning custom audio notifications to specific events and contacts. There's a massive online library of ringtones, and you can create your own from MP3 files.
5) Shake To Charge Battery
Life Mobile:OK, obviously this app is not actually charging your phone by asking you to shake it. It's a joke. People do stupid stuff with smartphones. It's just a gag, but a funny enough gag that it has a 4.2 rating on Google's app store and a really funny comment thread. Check it out.
6) ColorNote Notepad Notes
Notes: One of the more useful among the tons of notepad apps out there, ColorNote supports password locking, alarm reminders for your to-do list, and quick sharing of your random thoughts via SMS and Twitter. And of course you can color-coordinate that mess of notes that are piling up, or view them in a grid format. Online backup of your data is also available.


For the complete article go to http://www.datamation.com/mobile-wireless/free-android-apps-59-good-apps-1.html

Baca Selengkapnya ....

75 Open Source Replacements for Popular Small Business Software

Posted by Unknown 0 komentar

For many small businesses, open source software represents an unexplored gold mine. When you run a small business, budgets are always tight. While you need many of the same kinds of software that larger businesses need, you don't have hundreds or thousands of dollars to spend on that software like bigger companies do.
The open source community offers accounting, office productivity, project management, communication, customer relationship management and other types of software for SMBs for free. If your small business doesn't have any technical people on staff and you're worried about support, you can purchase services or use many of these applications on a software as a service (SaaS) basis -- and you'll still usually pay a lot less than you would for comparable commercial applications.

It's important to note that many of these open source apps really are comparable with their better known counterparts. They usually offer most of the features small businesses need, and many even read and write files created with proprietary software. For example, both OpenOffice and LibreOffice can open and save Microsoft file formats, so your partners, clients and suppliers will never know you aren't using Word, Excel or PowerPoint.
Below, we've updated our annual list of open source replacements for popular small business software. You'll find some new entries, as well as plenty of noteworthy applications that we've featured before. If you have another recommendation for our list, feel free to make note in the comments section below.

Accounting

1. TurboCASH
Replaces: QuickBooks, Sage Peachtree
Boasting more than 80,000 users, TurboCASH calls itself "one of the world's first fully-featured open source accounts packages for small business." It offers multi-user and multi-company capabilities with features like debtors, creditors, general ledger, full stock control, invoicing, bank reconciliation, trial balance, balance sheet and income statements and full reporting and analysis. Operating System: Windows.


Baca Selengkapnya ....

Top Open Source IP Address Management Software

Posted by Unknown 0 komentar

In this post you will find top open source software for IP address management (IPAM). If you are sysadmin at organization that holds pool of IP addresses and allocates its parts to clients then you must use IP address management tools to track used, reserved, allocated or free IP addresses. It usually prevents an overhead and allows to have clear picture of IP addresses resources usage within an organization on the whole. For example, it may be useful to know how many free IP networks are available for clients and take necessary actions before it happens there’s nothing to allocate. IP address management tools may also make it possible for you as a sysadmin to prevent fragmentation of IP addresses usage. Generally if you work at LIR then IP address management tool is a must.

IPplan

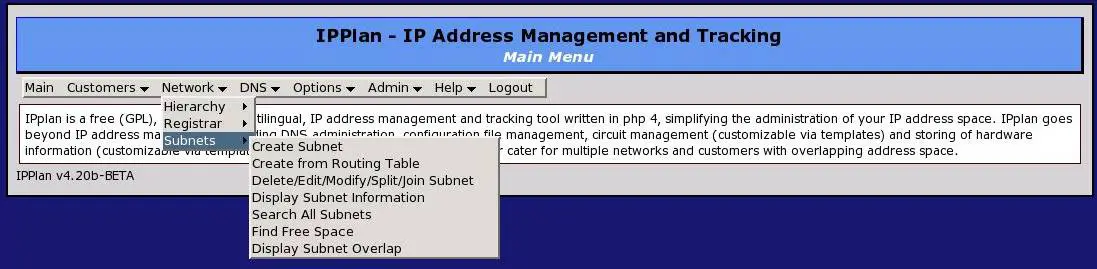
IPplan (formerly known as iptrack) provides clean web interface for IP address management with wide range of features like IPv6 support, multi-language  interface, split and join of IP networks, import from routing tables and XML/CVS files, multiple user groups, overlapping detection, search, audit, triggers and much more. IPplan stores its data in databases like Postgresq, Mysql or Oracle. Moreover IPplan provides API so you can create DHCP configs (for example) based on IPplan’s database.
ipplan screenshot
Documentation and Howtos: Official Documentation, Install and configure IPplan in OpenSuse, Installing IPplan.

GestióIP

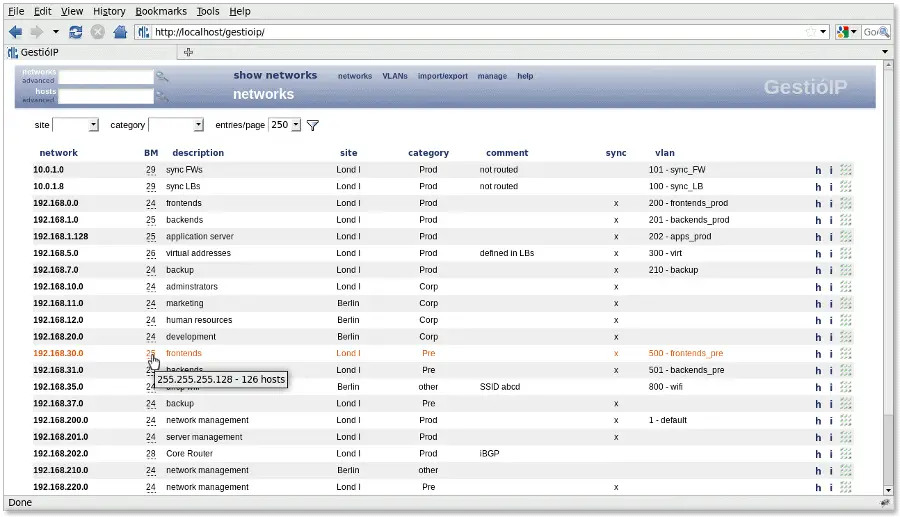
GestioIP is lively maintained IPAM system available under GPLv3 license. It provides web interface for IPv4 and IPv6 tracking, allows network discovering, search, filtering, splitting/joining of IP networks, statistics, embedded IP calc and much more. I would recommend GestióIP to those who need clean and simple IPAM with basic features. Btw, Gestió in Catalan means “management”.
GestioIP screenshot
Documentation and Howtos: Official Documentation.

OpenIPAM

OpenIPAM is open source (GPLv3 license) IPAM software developed by Utah State University’s Department of Information Technology that comes with the following features: distributed management of IP resources by multiple users and groups, clean web interface, API, LDAP support, expiration system and more. OpenIPAM stores its data in PostgreSQL.
openipam screenshot
Documents and Howtos: Official Documentation (wiki).

NOC

NOC is Operation Support System (OSS) for ISP and content provides that comes with builtin powerful IPAM module. It provides support of IPv4 and IPv6, clean web interface, access delegation, DNS integration, search, reporting tools and a lot of other features. NOC was designed for and is used by large ISP and datacenters. It is very powerful open source software.
Documentation and Howtos: Official Documentation, NOC Blogs, NOC: Brief Introduction into IP Address Management (IPAM).
Know some other open source IPAM software? Feel free to leave a comment with its name.

Baca Selengkapnya ....

18 Open Source Content Management Systems

Posted by Unknown 0 komentar

A content management system (CMS) is a system facilitating efficient production of desired output by using managed content. The content may be text, images, graphics, documents, sound, video or other that can be managed in an electronic format. It is a software application used in uploading, editing and managing content on a website. CMS has been gaining popularity as it handles various tasks including when to display content, how many times to display content to specific users and how the content interacts with other elements of the website. Open source CMS systems are popular for their quality, lower cost, reliability and flexibility.
This article is the first in a series that lists the advantages and disadvantages of the 18 most popular open source Content Management Systems. The first five are WordPress, Joomla, Drupal, Magento, and b2evolution.
1. WordPress
WordPress is a publishing platform focused on aesthetics, web standards, and usability. Working with WordPress does not require any knowledge of HTML. Ease of installation and upgrading make it a great fit for beginner webmasters and even for non-developers.
Using WordPress has these advantages to users:
  • The CMS tool has blogging options such as Posts, comments, media, links, simple pages, users etc.
  • Customization of the look of a website or addition of an extra feature is possible
  • Multilingual support: Although it lacks out of the box support for bilingual or multilingual blogs, plugins developed by the WordPress community permit creation of a multilingual blog
  • Many plugins are released by independent developers that enhance the user interface
  • Creation of new content is very easy with the visual text editor
  • Security from hackers is comparatively high for many community developers
Disadvantages are:
  • Limitations for bigger and more complicated sites
  • Better suited for blogs than general websites
  • Changing navigational structure requires knowledge of WP scripting language and CSS
  • Below average SEO friendly: SEO provided by WordPress is below average but can be improved with installation of a useful plugin
  • Attracts spambot
2. Joomla
Joomla is a much appreciated portal- or community type site CMS tool for simple websites and blogs. It comes with an easy to use graphical administrative interface and powerful WYSIWYG Editor that enables the creation and editing of pages. With Joomla, there is no need to use specialized tools or programming languages to update the sites. It has a large user base with a lively community where tips and tricks are shared.
Advantages of using Joomla as CMS tool are as follows:
  • Good choice for creating a community or network with a membership area, newsroom, forums, articles, input from external authors
  • Simple installation: takes a few minutes
  • In the most recent version of Joomla, a more complex navigation pattern is available that can support more than two-level hierarchies
  • A lot of functionality is built into Joomla hence it requires fewer plugins than WordPress
  • Easy to create a navigation structure: no need to have knowledge of Joomla scripting while changing the navigation structure and menus of the site
  • No knowledge of HTML is required
  • Multilingual Support: An extra module called Joomfish is required to facilitate multilingual support
  • Allows users to set article expiration dates, activation dates, author names, etc.
  • Has many development tools and tutorials to help users
  • Offers users a large community where advice, tips and tricks can be shared
Disadvantages of using Joomla:
  • Lacks advanced technologies hence not suitable for advanced web designers
  • Less security: Every site has its own login details making the work easier but leaving the site less secured
  • Less friendly to Search engine optimization
  • Certain plug-ins cost money which are available for free in WordPress
3. Drupal
Drupal is a free source PHP based CMS tool that allows an individual or a community of users to easily publish, manage and organize content on a website. Requiring complete control over scripting of sophisticated website design, Drupal is not very user friendly, but can be worked on only by professional web developers. Installation of Drupal is easy and straight forward for anyone familiar with installing applications on web servers. For web developers new to Drupal, it is a steep learning curve. It requires knowledge of a sophisticated programming language.
Drupal has gained popularity over other CMS for the following advantages:
  • Flexible yet robust content creation: There is flexibility in creating and managing different content types such as text, blogs, video, polls etc.
  • Using Drupal CMS, one can customize the URL path for each piece of content published on a website
  • Creation of own dynamic designs for pages of your own website
  • Drupal is the ideal platform for developing large websites with hundreds of pages
  • Highly scalable
  • Drupal is proven and secured
  • Multilingual Support: It requires only to activate a core module named Locale to enjoy multilingual support
  • SEO friendly: Drupal CMS software is ideal for search engine optimization
  • It has very strong community support
  • Large support base
Disadvantages of Drupal include following:
  • Not very user friendly and requires greater technical knowledge
  • Needs MySQL and Php language support
  • Customization of Drupal requires an expert user and developer
4. Magento
Magento is an open source ecommerce platform designed for customizing, managing and running an online portal.
Advantages of Magento include:
  • Well defined with core code and third party or community code allowing users to download other extensions or modules without worrying about the impact of future upgrades and or disrupting the current appearance of the website
  • SEO friendliness: Magento achieves high ranking on search engines Google and Bing
  • Large community of users: A community of users, developers and service providers are available to share their advice, tips and tricks
  • PHP written Magento is a feature rich ecommerce platform. It has all the features of a top of the line Ecommerce website such as advanced promotion and marketing tools.
  • Easy integration of additional layouts and Add-ons
  • Provides ability to manage multi stores from single Administration panel
  • Nice default template
Disadvantages are:
  • The CMS software is a complicated platform and follows best web programming practices
  • There are very few expert Magento developers available
  • Heavily layered and overly complicated coding style and large number of files required to learn and do customization
5. b2Evolution

B2Evolution is an open source blogging system distributed under the GNU General Public License, making it free to use and modify. A large number of plug-ins have been developed for the CMS including extensions allowing incorporation of third-party text editors. In addition, it also permits integration of functionality provided by popular websites including MySpace, YouTube, Digg etc. It is featured with friendly URLs, image resizing, photoblogs with thumbnails, UI levels, a WYSIWYG editor, spell check and style wizard. It is a multilingual, multi user, multi blog publishing CMS.
Advantages of b2Evolution:
  • Fast and easy installation of the software: can be installed on virtually any server configuration consisting of PHP and MySQL
  • Spam protection: Featured with blacklisting and CAPTCHA to prevent comments from automated bot programs, your blog will be free from annoying spam comments
  • B2Evolution provides multiple Theme support
  • Navigation is quite straight forward
  • Installation of plugins is quite simple
Disadvantages:
  • Difficult for non-technical blogger to use b2Evolution
  • Performing customization requires knowledge of the language of the PHP tribe
  • With  respect to availability of extensions and their ease of use, Add-on community is limited
  • User community is comparatively small
In the last article in this series we covered WordPress, Joomla, Drupal, Magento, and b2evolution, five leading Content Management Systems. In this article we talk about the next five: Xoops, Seotoaster, e107, Concrete5, and Typo3.
6. Xoops
Xoops (eXtensible Object Orientated Portal System) is an open source and ideal tool to develop small to large dynamic community web sites, corporate portals, web logs and much more. It is a dynamic object oriented portal script that is written in PHP and it supports MySQL. Easy to use, Xoops is an ideal tool to create data-driven community sites of all sizes. It is used for blogs, corporate intranet sites and content-rich information portals.
Advantages of Xoops:
  • Small learning curve
  • Easy installation
  • Addition of features to your website can be done easily through additional modules and themes
  • It has worldwide support available in a number of languages
  • Administrator can easily find users based on a variety of criteria.  Using a simple template-based system, he can send both emails and private messages
  • Using a theme-based template system, Xoops allows instant enhancing of the presentation of your site
  • Search Engine Friendly: Xoops supports many add-ons to help make your site more search engine-friendly
  • Theme capability
  • Worldwide Support
Disadvantages:
  • A provider should be equipped with the Apache web server, PHP and an SQL database, preferably MySQL
  • It requires installation of a number of modules and some of the documents for some modules are lacking. Because of this, it becomes time consuming for administrators to tweak these modules to get them to work.
7. Seotoaster
SEO Toaster is a free open source CMS and e-commerce software used by many big and small businesses. The powerful CMS is very light on resource usage. It represents an alternative to Yahoo Stores for small e-commerce websites or WordPress when used as a corporate or affiliate CMS. Featured with a unique architecture, the powerful CMS makes piloting SEO execution. It also helps in easy marketing for multiple websites from a central automated web marketing location. Seotoaster requires a single core to power and revise multiple websites hosted on the same server.
Advantages:
  • Provides ability to access a library of ready-to-use themes to jump-start your presence online
  • Customize and integrate open source shopping cart and other applications
  • Building one, two and more money-making websites for free is possible with SEO Toaster
  • SEO friendliness: In-built all latest SEO techniques right into their website from the get-go helps in achieving high rankings with Google and other search engines: No blog to read or SEO expert fees to pay
  • Much easier to use than WordPress and has scope of scalability
  • Seotoaster is easy for content writers, and website administrators featuring complete front-end edition


8. e107

e107 is an open source content management system covering every area of content management including admin, file and directory management, multimedia, e-commerce and so on. It is embed with simple, intuitive interface and flexible architecture which allows the CMS to perform well on anything ranging from blogs and personal websites to business sites and intranets.
Advantages of popular e107:
  • Loads of plugins available on the CMS
  • Easy to install
  • Great community support
  • Designers are available to create beautiful theme designs
  • Highly customizable
Disadvantages:
  • Not many plugins are available for bloggers
9. Concrete5
Concrete5 is a free open source CMS gaining popularity among designers for its focus on ease of use. With Concrete5, one can manage a small to medium size website as easy as a WYSIWYG. A great feature of Concrete5 is it keeps revising a page which make it easy to roll back to a previous version of the page.
Advantages include:
  • The Concrete5 platform is quite flexible and easy to edit and update
  • Best for non-programmers that want a static website
  • Creating themes with Concrete5 is very easy
  • SEO friendly
  • Multilingual support
  • One can develop own themes
Disadvantages include:
  • It needs solid knowledge of HTML/CSS and an acquaintance with PHP
  • Community is not very large
  • It needs a blank database, which can be frustrating if on a shared hos
10. Typo3
 TYPO3 is an open source enterprise-class content management system. The powerful TYPO3 can handle large and complex websites. It has a broad base of extensions and developers that can add to its functionality. A developer is able to create pages with a variety of content elements such as regular text, forms, multimedia, file links, etc. Advantages include:
  • Many extensions
  • Powerful scripting allows flexibility without custom PHP plugins
  • Unlimited scalability: Typo3 can acquire new functionality and expand or modify existing ones with special modules
  • The CMS allows working with draft versions of web site without affecting live site content
  • Unlimited Undo/History levels make it possible to roll back your changes to a previous state, regardless of how old that stage is
  • Multiple domains/sites on one installation: Single Typo3 installation facilitates working on several web sites with different domains. This is useful when your sites have shared or related content or when these sites belong to one complex project
  • Gives the ability to temporarily hide some content without deletin
  • Huge international developer community
  • Multilingual
  • Security: A high level of protection from hacker attacks or hijacking of business-critical company websites is offered
Disadvantages:
  • Learning typoscript is time consuming
  • The documentation lacks detail and needs more examples
  • It’s not suitable for small websites
  • Many extensions haven’t been updated in years
This is the third blog post in a series of blog posts about open source Content Management Systems (CMS). You can find the first two parts here (Part 1) and here (Part 2) .
In the last article in this series we covered Xoops, Seotoaster, e107, Concrete5, and Typo3, five leading Content Management Systems. In this article we talk about the next five: MediaWiki, Moveable Type, dotCMS, Dotclear, and Zope/Plone.


11. Media Wiki
MediaWiki is a PHP designed open source software wiki package, initially built for use on Wikipedia. Now it is used by several other projects of the non-profit Wikimedia Foundation and by many other wikis, including this website, the home of MediaWiki. The free software is available under the license of the GPL. It runs on a LAMP (Linux, Apache, MySQL, PHP) architecture. It’s designed to run on large server farms for websites that get millions of hits per day.
Advantages include:
  • Scalability: It is scalable and powerful, with many features not commonly found in Wiki systems
  • MediaWiki supports a multiple server environment allowing it to scale up for high usage situations such as massive collaborations
  • Powerful and robust, MediaWiki is capable of handling hundreds of millions of pages
  • Multiple users can simultaneously update, modify and edit pages on the CMS which is designed for a collaborative environment


12. Movable Type
Movable Type is a free, all-in-one content management system that helps in building and operating an eCommerce site and creating a social networking site. It also lets developers manage large volumes of content and run a blog, while also functioning as an intranet. This content management system has gained popularity in various circles including media and publishing companies, design and development firms, power bloggers and marketing and communications folks.
Advantages include:
  • Managing your website with Movable Type is quite easy through the administrator interface
  • With one installment, one can manage multiple websites/blogs
  • It is scalable. As your site grows, the platform scales to meet fluctuating traffic needs
  • It is quick and easy to make new templates and requires very little technical knowledge using the built-in tools
  • It’s easy to publish content in either entry or page form and add custom fields as you go
  • Optional support for bloggers, online support for businesses and premium support for enterprise and high-traffic bloggers
  • It supports multiple users, themes, comments and tagging
Disadvantages include:
  • It takes longest time to install in comparison to other CMS
  • Active community is significantly smaller than more popular content management systems


13. DotCMS
DotCMS is an enterprise-grade open source J2EE/Java Web Content Management System. It is used for controlling websites and managing content such as media, modules, text and other add-ons. Users with moderate or no technical ability can make massive changes on a site while working on dotCMS. The combination of open source and Java Script makes it sophisticated, innovative and customizable. Intended to serve CMS-driven e-commerce, it allows corporations, institutions and organizations to move at a quicker pace without the need for Java development talent within a Web Team. Some of the organizations that run on dotCMS Enterprise Edition are Toyota, Hospital Corporation of America, University of Texas, Thomson Reuters, Aquent, State of Ohio, and the Government of Quebec.

Advantages include:
  • It offers a certified and warranted Enterprise solution in addition to a Community version
  • Using dotCMS, clients with little or no technical knowledge can manage an open source portal, company web site, or intranet application
  • It is suitable for a document management application, or an information portal of any type
  • dotCMS enables the marketing department to tag, segment and group site visitors by any number of criteria. For example by the pages they visit, the time of their last visit, their demographic information and any of their indicated interests
Disadvantages include:
  • Unlike other open source CMS, dotCMS requires one to have root access to the server for installation of things like Apache Tomcat


14. Dotclear
Dotclear is a French open source CMS under the GNU General Public License. It is a blogging platform available in English. Developers can create multiple blogs with one installation. The open-source web publishing software offers a very user-friendly backend. Anyone with little technical knowledge can publish on the web using Dotclear, a user-friendly tool.
Advantages include:
  • Easy publication
  • Package engine allows 1-click install for plug-ins and themes
  • Fully customizable theme
  • User-friendly administration
  • Low requirements (PHP4/MySQL4) help to minimize hosting dependencies
  • Flexible comment system
  • Performance and scalability
  • Huge number of available plug-ins
Disadvantages include:
  • Single-site only
  • Rudimentary security features
  • Not suitable for large enterprise projects
  • Very limited assets manager


15. Zope/Plone 

Plone is an open source and web CMS that is based on the Zope application server, which uses the Python language. This is unique in a world filled with PHP applications. It is famous among developers as an intranet, portal, web site or community site. It helps them to manage all sorts of content, organized into folders that can be uploaded by a community of users.
Advantages include:
  • Far less vulnerability than PHP-based systems
  • Extremely extensible and flexible
  • Wide range of 3rd-party products to deal with off-norm use-cases
  • Extraordinarily helpful community
  • Excellent i18N support
  • Scalability: Plone scales to enterprise levels
  • World-wide availability of professional trainers and consultants
  • More secure than systems like Drupal and Joomla
Disadvantages include:
  • Requires knowledge of Zope and Python
  • Not very user friendly for non-technical users
  • Plone’s CMS niche is often confused with other, less powerful OSS CMS due to its operation at the confluence of web content management, social S/W & collaboration, and enterprise portals
  • Very steep learning curve
  • Not very good web 2.0 support (blogs, forums, streaming media etc.)

Baca Selengkapnya ....

Virtualization With KVM On A CentOS 6.2 Server

Posted by Unknown 0 komentar

This guide explains how you can install and use KVM for creating and running virtual machines on a CentOS 6.2 server. I will show how to create image-based virtual machines and also virtual machines that use a logical volume (LVM). KVM is short for Kernel-based Virtual Machine and makes use of hardware virtualization, i.e., you need a CPU that supports hardware virtualization, e.g. Intel VT or AMD-V.
I do not issue any guarantee that this will work for you!

1 Preliminary Note

I'm using a CentOS 6.2 server with the hostname server1.example.com and the IP address 192.168.0.100 here as my KVM host.
I had SELinux disabled on my CentOS 6.2 system. I didn't test with SELinux on; it might work, but if not, you better switch off SELinux as well:
vi /etc/selinux/config
Set SELINUX=disabled...
# This file controls the state of SELinux on the system.
# SELINUX= can take one of these three values:
# enforcing - SELinux security policy is enforced.
# permissive - SELinux prints warnings instead of enforcing.
# disabled - No SELinux policy is loaded.
SELINUX=disabled
# SELINUXTYPE= can take one of these two values:
# targeted - Targeted processes are protected,
# mls - Multi Level Security protection.
SELINUXTYPE=targeted
... and reboot:
reboot
We also need a desktop system where we install virt-manager so that we can connect to the graphical console of the virtual machines that we install. I'm using a Fedora 16 desktop here.

2 Installing KVM

CentOS 6.2 KVM Host:
First check if your CPU supports hardware virtualization - if this is the case, the command
egrep '(vmx|svm)' --color=always /proc/cpuinfo
should display something, e.g. like this:
[root@server1 ~]# egrep '(vmx|svm)' --color=always /proc/cpuinfo
flags           : fpu vme de pse tsc msr pae mce cx8 apic sep mtrr pge mca cmov pat pse36 clflush mmx fxsr sse sse2 ht syscall
 nx mmxext fxsr_opt rdtscp lm 3dnowext 3dnow pni cx16 lahf_lm cmp_legacy svm extapic cr8_legacy misalignsse
flags           : fpu vme de pse tsc msr pae mce cx8 apic sep mtrr pge mca cmov pat pse36 clflush mmx fxsr sse sse2 ht syscall
 nx mmxext fxsr_opt rdtscp lm 3dnowext 3dnow pni cx16 lahf_lm cmp_legacy svm extapic cr8_legacy misalignsse
[root@server1 ~]#
If nothing is displayed, then your processor doesn't support hardware virtualization, and you must stop here.
Now we import the GPG keys for software packages:
rpm --import /etc/pki/rpm-gpg/RPM-GPG-KEY*
To install KVM and virtinst (a tool to create virtual machines), we run
yum install kvm libvirt python-virtinst qemu-kvm
Then start the libvirt daemon:
/etc/init.d/libvirtd start
To check if KVM has successfully been installed, run
virsh -c qemu:///system list
It should display something like this:
[root@server1 ~]# virsh -c qemu:///system list
 Id Name                 State
----------------------------------

[root@server1 ~]#
If it displays an error instead, then something went wrong.
Next we need to set up a network bridge on our server so that our virtual machines can be accessed from other hosts as if they were physical systems in the network.
To do this, we install the package bridge-utils...
yum install bridge-utils
... and configure a bridge. Create the file /etc/sysconfig/network-scripts/ifcfg-br0 (please use the IPADDR, PREFIX, GATEWAY, DNS1 and DNS2 values from the /etc/sysconfig/network-scripts/ifcfg-eth0 file); make sure you use TYPE=Bridge, not TYPE=Ethernet:
vi /etc/sysconfig/network-scripts/ifcfg-br0
DEVICE="br0"
NM_CONTROLLED="yes"
ONBOOT=yes
TYPE=Bridge
BOOTPROTO=none
IPADDR=192.168.0.100
PREFIX=24
GATEWAY=192.168.0.1
DNS1=8.8.8.8
DNS2=8.8.4.4
DEFROUTE=yes
IPV4_FAILURE_FATAL=yes
IPV6INIT=no
NAME="System br0"
Modify /etc/sysconfig/network-scripts/ifcfg-eth0 as follows (comment out BOOTPROTO, IPADDR, PREFIX, GATEWAY, DNS1, and DNS2 and add BRIDGE=br0):
vi /etc/sysconfig/network-scripts/ifcfg-eth0
DEVICE="eth0"
NM_CONTROLLED="yes"
ONBOOT=yes
HWADDR=00:1E:90:F3:F0:02
TYPE=Ethernet
#BOOTPROTO=none
#IPADDR=192.168.0.100
#PREFIX=24
#GATEWAY=192.168.0.1
#DNS1=8.8.8.8
#DNS2=8.8.4.4
DEFROUTE=yes
IPV4_FAILURE_FATAL=yes
IPV6INIT=no
NAME="System eth0"
UUID=5fb06bd0-0bb0-7ffb-45f1-d6edd65f3e03
BRIDGE=br0
Restart the network...
/etc/init.d/network restart
... and run
ifconfig
It should now show the network bridge (br0):
[root@server1 ~]# ifconfig
br0       Link encap:Ethernet  HWaddr 00:1E:90:F3:F0:02
          inet addr:192.168.0.100  Bcast:192.168.0.255  Mask:255.255.255.0
          inet6 addr: fe80::21e:90ff:fef3:f002/64 Scope:Link
          UP BROADCAST RUNNING MULTICAST  MTU:1500  Metric:1
          RX packets:103 errors:0 dropped:0 overruns:0 frame:0
          TX packets:79 errors:0 dropped:0 overruns:0 carrier:0
          collisions:0 txqueuelen:0
          RX bytes:7434 (7.2 KiB)  TX bytes:21398 (20.8 KiB)

eth0      Link encap:Ethernet  HWaddr 00:1E:90:F3:F0:02
          inet6 addr: fe80::21e:90ff:fef3:f002/64 Scope:Link
          UP BROADCAST RUNNING PROMISC MULTICAST  MTU:1500  Metric:1
          RX packets:19511 errors:0 dropped:0 overruns:0 frame:0
          TX packets:11592 errors:0 dropped:0 overruns:0 carrier:0
          collisions:0 txqueuelen:1000
          RX bytes:25980124 (24.7 MiB)  TX bytes:1104371 (1.0 MiB)
          Interrupt:28 Base address:0x6000

lo        Link encap:Local Loopback
          inet addr:127.0.0.1  Mask:255.0.0.0
          inet6 addr: ::1/128 Scope:Host
          UP LOOPBACK RUNNING  MTU:16436  Metric:1
          RX packets:7 errors:0 dropped:0 overruns:0 frame:0
          TX packets:7 errors:0 dropped:0 overruns:0 carrier:0
          collisions:0 txqueuelen:0
          RX bytes:3608 (3.5 KiB)  TX bytes:3608 (3.5 KiB)

virbr0    Link encap:Ethernet  HWaddr 6A:12:69:18:2B:05
          inet addr:192.168.122.1  Bcast:192.168.122.255  Mask:255.255.255.0
          UP BROADCAST RUNNING MULTICAST  MTU:1500  Metric:1
          RX packets:0 errors:0 dropped:0 overruns:0 frame:0
          TX packets:0 errors:0 dropped:0 overruns:0 carrier:0
          collisions:0 txqueuelen:0
          RX bytes:0 (0.0 b)  TX bytes:0 (0.0 b)

[root@server1 ~]#

3 Installing virt-viewer Or virt-manager On Your Fedora 16 Desktop

Fedora 16 Desktop:
We need a means of connecting to the graphical console of our guests - we can use virt-manager for this. I'm assuming that you're using a Fedora 16 desktop.
Become root...
su
... and run...
yum install virt-manager libvirt qemu-system-x86 openssh-askpass
... to install virt-manager.
(If you're using an Ubuntu 11.10 desktop, you can install virt-manager as follows:
sudo apt-get install virt-manager
)

4 Creating A Debian Squeeze Guest (Image-Based) From The Command Line

CentOs 6.2 KVM Host:
Now let's go back to our CentOS 6.2 KVM host.
Take a look at
man virt-install
to learn how to use virt-install.
We will create our image-based virtual machines in the directory /var/lib/libvirt/images/ which was created automatically when we installed KVM in chapter two.
To create a Debian Squeeze guest (in bridging mode) with the name vm10, 512MB of RAM, two virtual CPUs, and the disk image /var/lib/libvirt/images/vm10.img (with a size of 12GB), insert the Debian Squeeze Netinstall CD into the CD drive and run
virt-install --connect qemu:///system -n vm10 -r 512 --vcpus=2 --disk path=/var/lib/libvirt/images/vm10.img,size=12 -c /dev/cdrom --vnc --noautoconsole --os-type linux --os-variant debiansqueeze --accelerate --network=bridge:br0 --hvm
Of course, you can also create an ISO image of the Debian Squeeze Netinstall CD (please create it in the /var/lib/libvirt/images/ directory because later on I will show how to create virtual machines through virt-manager from your Fedora desktop, and virt-manager will look for ISO images in the /var/lib/libvirt/images/ directory)...
dd if=/dev/cdrom of=/var/lib/libvirt/images/debian-6.0.2.1-amd64-netinst.iso
... and use the ISO image in the virt-install command:
virt-install --connect qemu:///system -n vm10 -r 512 --vcpus=2 --disk path=/var/lib/libvirt/images/vm10.img,size=12 -c /var/lib/libvirt/images/debian-6.0.2.1-amd64-netinst.iso --vnc --noautoconsole --os-type linux --os-variant debiansqueeze --accelerate --network=bridge:br0 --hvm
The output is as follows:
[root@server1 ~]# virt-install --connect qemu:///system -n vm10 -r 512 --vcpus=2 --disk path=/var/lib/libvirt/images/vm10.img,size=12 -c /var/lib/libvirt/images/debian-6.0.2.1-amd64-netinst.iso --vnc --noautoconsole --os-type linux --os-variant debiansqueeze --accelerate --network=bridge:br0 --hvm


Starting install...
Allocating 'vm10.img'              |  12 GB     00:00
Creating domain...                 |    0 B     00:00
Domain installation still in progress. You can reconnect to
the console to complete the installation process.
[root@server1 ~]#

5 Connecting To The Guest

 
Fedora 16 Desktop:
The KVM guest will now boot from the Debian Squeeze Netinstall CD and start the Debian installer - that's why we need to connect to the graphical console of the guest. You can do this with virt-manager on the Fedora 16 desktop.
Go to Applications > System Tools > Virtual Machine Manager to start virt-manager:


When you start virt-manager for the first time, you will most likely see the following message (Unable to open a connection to the libvirt management daemon.). You can ignore this because we don't want to connect to the local libvirt daemon, but to the one on our CentOS 6.2 KVM host. Click on Close...


... and go to File > Add Connection... to connect to our CentOS 6.2 KVM host:


Select QEMU/KVM as Hypervisor, then check Connect to remote host, select SSH in the Method drop-down menu, type in root as the Username and the hostname (server1.example.com) or IP address (192.168.0.100) of the CentOS 6.2 KVM host in the Hostname field. Then click on Connect:


If this is the first connection to the remote KVM server, you must type in yes and click on OK:


Afterwards type in the root password of the CentOS 6.2 KVM host:


You should see vm10 as running. Mark that guest and click on the Open button to open the graphical console of the guest:


Type in the root password of the KVM host again:


You should now be connected to the graphical console of the guest and see the Debian installer:


Now install Debian as you would normally do on a physical system. Please note that at the end of the installation, the Debian guest needs a reboot. The guest will then stop, so you need to start it again, either with virt-manager or like this on our CentOS 6.2 KVM host command line:
CentOS 6.2 KVM Host:
virsh --connect qemu:///system
start vm10
quit
Afterwards, you can connect to the guest again with virt-manager and configure the guest. If you install OpenSSH (package openssh-server) in the guest, you can connect to it with an SSH client (such as PuTTY).


6 Creating A Debian Squeeze Guest (Image-Based) From The Desktop With virt-manager

 
Instead of creating a virtual machine from the command line (as shown in chapter 4), you can as well create it from the Fedora desktop using virt-manager (of course, the virtual machine will be created on the CentOS 6.2 KVM host - in case you ask yourself if virt-manager is able to create virtual machines on remote systems).
To do this, click on the following button:

The New VM dialogue comes up. Fill in a name for the VM (e.g. vm11), select Local install media (ISO image or CDROM), and click on Forward:


Next select Linux in the OS type drop-down menu and Debian Squeeze in the Version drop-down menu, then check Use ISO image and click on the Browse... button:


Select the debian-6.0.2.1-amd64-netinst.iso image that you created in chapter 4 and click on Choose Volume:


Now click on Forward:


Assign memory and the number of CPUs to the virtual machine and click on Forward:


Now we come to the storage. Check Enable storage for this virtual machine, select Create a disk image on the computer's hard drive, specify the size of the hard drive (e.g. 12GB), and check Allocate entire disk now. Then click on Forward:


Now we come to the last step of the New VM dialogue. Go to the Advanced options section. Select Host device vnet0 (Bridge 'br0'); that is the name of the bridge which we created in chapter 2. Click on Finish afterwards:


The disk image for the VM is now being created:


Afterwards, the VM will start. Type in the root password of the CentOS 6.2 KVM host:


You should now be connected to the graphical console of the guest and see the Debian installer:


Now install Debian as you would normally do on a physical system.


7 Managing A KVM Guest From The Command Line

 
CentOS 6.2 KVM Host:
KVM guests can be managed through virsh, the "virtual shell". To connect to the virtual shell, run
virsh --connect qemu:///system
This is how the virtual shell looks:
[root@server1 ~]# virsh --connect qemu:///system
Welcome to virsh, the virtualization interactive terminal.

Type:  'help' for help with commands
       'quit' to quit

virsh #
You can now type in commands on the virtual shell to manage your guests. Run
help
to get a list of available commands:
virsh # help
Grouped commands:

 Domain Management (help keyword 'domain'):
    attach-device                  attach device from an XML file
    attach-disk                    attach disk device
    attach-interface               attach network interface
    autostart                      autostart a domain
    blkiotune                      Get or set blkio parameters
    blockpull                      Populate a disk from its backing image.
    blockjob                       Manage active block operations.
    console                        connect to the guest console
    cpu-baseline                   compute baseline CPU
    cpu-compare                    compare host CPU with a CPU described by an XML file
    create                         create a domain from an XML file
    define                         define (but don't start) a domain from an XML file
    destroy                        destroy (stop) a domain
    detach-device                  detach device from an XML file
    detach-disk                    detach disk device
    detach-interface               detach network interface
    domid                          convert a domain name or UUID to domain id
    domjobabort                    abort active domain job
    domjobinfo                     domain job information
    domname                        convert a domain id or UUID to domain name
    domuuid                        convert a domain name or id to domain UUID
    domxml-from-native             Convert native config to domain XML
    domxml-to-native               Convert domain XML to native config
    dump                           dump the core of a domain to a file for analysis
    dumpxml                        domain information in XML
    edit                           edit XML configuration for a domain
    inject-nmi                     Inject NMI to the guest
    send-key                       Send keycodes to the guest
    managedsave                    managed save of a domain state
    managedsave-remove             Remove managed save of a domain
    maxvcpus                       connection vcpu maximum
    memtune                        Get or set memory parameters
    migrate                        migrate domain to another host
    migrate-setmaxdowntime         set maximum tolerable downtime
    migrate-setspeed               Set the maximum migration bandwidth
    reboot                         reboot a domain
    restore                        restore a domain from a saved state in a file
    resume                         resume a domain
    save                           save a domain state to a file
    save-image-define              redefine the XML for a domain's saved state file
    save-image-dumpxml             saved state domain information in XML
    save-image-edit                edit XML for a domain's saved state file
    schedinfo                      show/set scheduler parameters
    screenshot                     take a screenshot of a current domain console and store it into a file
    setmaxmem                      change maximum memory limit
    setmem                         change memory allocation
    setvcpus                       change number of virtual CPUs
    shutdown                       gracefully shutdown a domain
    start                          start a (previously defined) inactive domain
    suspend                        suspend a domain
    ttyconsole                     tty console
    undefine                       undefine an inactive domain
    update-device                  update device from an XML file
    vcpucount                      domain vcpu counts
    vcpuinfo                       detailed domain vcpu information
    vcpupin                        control or query domain vcpu affinity
    version                        show version
    vncdisplay                     vnc display

 Domain Monitoring (help keyword 'monitor'):
    domblkinfo                     domain block device size information
    domblklist                     list all domain blocks
    domblkstat                     get device block stats for a domain
    domcontrol                     domain control interface state
    domifstat                      get network interface stats for a domain
    dominfo                        domain information
    dommemstat                     get memory statistics for a domain
    domstate                       domain state
    list                           list domains

 Host and Hypervisor (help keyword 'host'):
    capabilities                   capabilities
    connect                        (re)connect to hypervisor
    freecell                       NUMA free memory
    hostname                       print the hypervisor hostname
    nodecpustats                   Prints cpu stats of the node.
    nodeinfo                       node information
    nodememstats                   Prints memory stats of the node.
    qemu-attach                    QEMU Attach
    qemu-monitor-command           QEMU Monitor Command
    sysinfo                        print the hypervisor sysinfo
    uri                            print the hypervisor canonical URI

 Interface (help keyword 'interface'):
    iface-begin                    create a snapshot of current interfaces settings, which can be later commited (iface-commit) or restored (iface-rollback)
    iface-commit                   commit changes made since iface-begin and free restore point
    iface-define                   define (but don't start) a physical host interface from an XML file
    iface-destroy                  destroy a physical host interface (disable it / "if-down")
    iface-dumpxml                  interface information in XML
    iface-edit                     edit XML configuration for a physical host interface
    iface-list                     list physical host interfaces
    iface-mac                      convert an interface name to interface MAC address
    iface-name                     convert an interface MAC address to interface name
    iface-rollback                 rollback to previous saved configuration created via iface-begin
    iface-start                    start a physical host interface (enable it / "if-up")
    iface-undefine                 undefine a physical host interface (remove it from configuration)

 Network Filter (help keyword 'filter'):
    nwfilter-define                define or update a network filter from an XML file
    nwfilter-dumpxml               network filter information in XML
    nwfilter-edit                  edit XML configuration for a network filter
    nwfilter-list                  list network filters
    nwfilter-undefine              undefine a network filter

 Networking (help keyword 'network'):
    net-autostart                  autostart a network
    net-create                     create a network from an XML file
    net-define                     define (but don't start) a network from an XML file
    net-destroy                    destroy (stop) a network
    net-dumpxml                    network information in XML
    net-edit                       edit XML configuration for a network
    net-info                       network information
    net-list                       list networks
    net-name                       convert a network UUID to network name
    net-start                      start a (previously defined) inactive network
    net-undefine                   undefine an inactive network
    net-uuid                       convert a network name to network UUID

 Node Device (help keyword 'nodedev'):
    nodedev-create                 create a device defined by an XML file on the node
    nodedev-destroy                destroy (stop) a device on the node
    nodedev-dettach                dettach node device from its device driver
    nodedev-dumpxml                node device details in XML
    nodedev-list                   enumerate devices on this host
    nodedev-reattach               reattach node device to its device driver
    nodedev-reset                  reset node device

 Secret (help keyword 'secret'):
    secret-define                  define or modify a secret from an XML file
    secret-dumpxml                 secret attributes in XML
    secret-get-value               Output a secret value
    secret-list                    list secrets
    secret-set-value               set a secret value
    secret-undefine                undefine a secret

 Snapshot (help keyword 'snapshot'):
    snapshot-create                Create a snapshot from XML
    snapshot-create-as             Create a snapshot from a set of args
    snapshot-current               Get or set the current snapshot
    snapshot-delete                Delete a domain snapshot
    snapshot-dumpxml               Dump XML for a domain snapshot
    snapshot-edit                  edit XML for a snapshot
    snapshot-list                  List snapshots for a domain
    snapshot-parent                Get the name of the parent of a snapshot
    snapshot-revert                Revert a domain to a snapshot

 Storage Pool (help keyword 'pool'):
    find-storage-pool-sources-as   find potential storage pool sources
    find-storage-pool-sources      discover potential storage pool sources
    pool-autostart                 autostart a pool
    pool-build                     build a pool
    pool-create-as                 create a pool from a set of args
    pool-create                    create a pool from an XML file
    pool-define-as                 define a pool from a set of args
    pool-define                    define (but don't start) a pool from an XML file
    pool-delete                    delete a pool
    pool-destroy                   destroy (stop) a pool
    pool-dumpxml                   pool information in XML
    pool-edit                      edit XML configuration for a storage pool
    pool-info                      storage pool information
    pool-list                      list pools
    pool-name                      convert a pool UUID to pool name
    pool-refresh                   refresh a pool
    pool-start                     start a (previously defined) inactive pool
    pool-undefine                  undefine an inactive pool
    pool-uuid                      convert a pool name to pool UUID

 Storage Volume (help keyword 'volume'):
    vol-clone                      clone a volume.
    vol-create-as                  create a volume from a set of args
    vol-create                     create a vol from an XML file
    vol-create-from                create a vol, using another volume as input
    vol-delete                     delete a vol
    vol-download                   Download a volume to a file
    vol-dumpxml                    vol information in XML
    vol-info                       storage vol information
    vol-key                        returns the volume key for a given volume name or path
    vol-list                       list vols
    vol-name                       returns the volume name for a given volume key or path
    vol-path                       returns the volume path for a given volume name or key
    vol-pool                       returns the storage pool for a given volume key or path
    vol-upload                     upload a file into a volume
    vol-wipe                       wipe a vol

 Virsh itself (help keyword 'virsh'):
    cd                             change the current directory
    echo                           echo arguments
    exit                           quit this interactive terminal
    help                           print help
    pwd                            print the current directory
    quit                           quit this interactive terminal


virsh #
list
shows all running guests;
list --all
shows all guests, running and inactive:
virsh # list --all
 Id Name                 State
----------------------------------
  3 vm11                 running
  - vm10                 shut off

virsh #
If you modify a guest's xml file (located in the /etc/libvirt/qemu/ directory), you must redefine the guest:
define /etc/libvirt/qemu/vm10.xml
Please note that whenever you modify the guest's xml file in /etc/libvirt/qemu/, you must run the define command again!
To start a stopped guest, run:
start vm10
To stop a guest, run
shutdown vm10
To immediately stop it (i.e., pull the power plug), run
destroy vm10
Suspend a guest:
suspend vm10
Resume a guest:
resume vm10
These are the most important commands.
Type
quit
to leave the virtual shell.


8 Creating An LVM-Based Guest From The Command Line

 
CentOS 6.2 KVM Host:
LVM-based guests have some advantages over image-based guests. They are not as heavy on hard disk IO, and they are easier to back up (using LVM snapshots).
To use LVM-based guests, you need a volume group that has some free space that is not allocated to any logical volume. In this example, I use the volume group /dev/vg_server1 with a size of approx. 465GB...
vgdisplay
[root@server1 ~]# vgdisplay
  --- Volume group ---
  VG Name               vg_server1
  System ID
  Format                lvm2
  Metadata Areas        1
  Metadata Sequence No  5
  VG Access             read/write
  VG Status             resizable
  MAX LV                0
  Cur LV                3
  Open LV               3
  Max PV                0
  Cur PV                1
  Act PV                1
  VG Size               465.27 GiB
  PE Size               4.00 MiB
  Total PE              119109
  Alloc PE / Size       24480 / 95.62 GiB
  Free  PE / Size       94629 / 369.64 GiB
  VG UUID               jk2N5a-pQdV-I49Y-UCR9-A0Js-jEe0-0y6Ipg

[root@server1 ~]#
... that contains the logical volumes /dev/vg_server1/lv_root with a size of approx. 50GB, /dev/vg_server1/lv_home with a size of approx. 40GB, and /dev/vg_server1/lv_swap (about 6GB) - the rest is not allocated and can be used for KVM guests:
lvdisplay
[root@server1 ~]# lvdisplay
  --- Logical volume ---
  LV Name                /dev/vg_server1/lv_root
  VG Name                vg_server1
  LV UUID                il99XH-Q7QV-R16x-Q51X-GOzp-8uq1-aMUb82
  LV Write Access        read/write
  LV Status              available
  # open                 1
  LV Size                50.00 GiB
  Current LE             12800
  Segments               1
  Allocation             inherit
  Read ahead sectors     auto
  - currently set to     256
  Block device           253:0

  --- Logical volume ---
  LV Name                /dev/vg_server1/lv_home
  VG Name                vg_server1
  LV UUID                2OqWO9-4P91-UDzK-K6i3-zgJz-vJWN-9OMXpi
  LV Write Access        read/write
  LV Status              available
  # open                 1
  LV Size                40.00 GiB
  Current LE             10240
  Segments               1
  Allocation             inherit
  Read ahead sectors     auto
  - currently set to     256
  Block device           253:2

  --- Logical volume ---
  LV Name                /dev/vg_server1/lv_swap
  VG Name                vg_server1
  LV UUID                f5e90C-DMt8-896t-MmNo-S2FM-7hSd-gtVGjy
  LV Write Access        read/write
  LV Status              available
  # open                 1
  LV Size                5.62 GiB
  Current LE             1440
  Segments               1
  Allocation             inherit
  Read ahead sectors     auto
  - currently set to     256
  Block device           253:1

[root@server1 ~]#
I will now create the virtual machine vm12 as an LVM-based guest. I want vm12 to have 20GB of disk space, so I create the logical volume /dev/vg_server1/vm12 with a size of 20GB:
lvcreate -L20G -n vm12 vg_server1
Afterwards, we use the virt-install command again to create the guest:
virt-install --connect qemu:///system -n vm12 -r 512 --vcpus=2 --disk path=/dev/vg_server1/vm12 -c /var/lib/libvirt/images/debian-6.0.2.1-amd64-netinst.iso --vnc --noautoconsole --os-type linux --os-variant debiansqueeze --accelerate --network=bridge:br0 --hvm
Please note that instead of --disk path=/var/lib/libvirt/images/vm12.img,size=20 I use --disk path=/dev/vg_server1/vm12, and I don't need to define the disk space anymore because the disk space is defined by the size of the logical volume vm12 (20GB).
Now follow chapter 5 to install that guest.

9 Converting Image-Based Guests To LVM-Based Guests

CentOS 6.2 Host:
No let's assume we want to convert our image-based guest vm10 into an LVM-based guest. This is how we do it:
First make sure the guest is stopped:
virsh --connect qemu:///system
shutdown vm10
quit
Then create a logical volume (e.g. /dev/vg_server1/vm10) that has the same size as the image file - the image has 12GB, so the logical volume must have 12GB of size as well:
lvcreate -L12G -n vm10 vg_server1
Now we convert the image:
qemu-img convert /var/lib/libvirt/images/vm10.img -O raw /dev/vg_server1/vm10
Afterwards you can delete the disk image:
rm -f /var/lib/libvirt/images/vm10.img
Now we must open the guest's xml configuration file /etc/libvirt/qemu/vm10.xml...
vi /etc/libvirt/qemu/vm10.xml
... and change the following section...
[...]


[...]
... so that it looks as follows:
[...]


[...]
Afterwards we must redefine the guest:
virsh --connect qemu:///system
define /etc/libvirt/qemu/vm10.xml
Still on the virsh shell, we can start the guest...
start vm10
... and leave the virsh shell:
quit

10 Links


Baca Selengkapnya ....
Trik SEO Terbaru support Online Shop Baju Wanita - Original design by Bamz | Copyright of android japan.