Motorola Moto G

Posted by Unknown Kamis, 23 Januari 2014 0 komentar


Motorola Moto G new Launched Android Phone!!!!


Moto G is an Android smartphone developed and manufactured by Motorola Mobility. Unveiled on November 13, 2013, the phone has been initially aimed at developing markets, while those that live in developed markets will also have it available as a lower-cost option compared to other phones in its class.
Image
Specification :-
GENERAL 2G Network GSM 850 / 900 / 1800 / 1900
CDMA 800 / 1900 – CDMA version
3G Network HSDPA 850 / 900 / 1900 / 2100
CDMA2000 1xEV-DO – CDMA version
SIM Micro-SIM
Announced 2013, November
Status Available. Released 2013, November
BODY Dimensions 129.9 x 65.9 x 11.6 mm (5.11 x 2.59 x 0.46 in)
Weight 143 g (5.04 oz)
DISPLAY Type IPS LCD capacitive touchscreen, 16M colors
Size 720 x 1280 pixels, 4.5 inches (~326 ppi pixel density)
Multitouch Yes
Protection Corning Gorilla Glass 3
SOUND Alert types Vibration, MP3, WAV ringtones
Loudspeaker Yes
3.5mm jack Yes
MEMO Card slot No
Internal 8/16 GB, 1 GB RAM
DATA GPRS Yes
EDGE Yes
Speed HSDPA, 21 Mbps; HSUPA
WLAN Wi-Fi 802.11 b/g/n, Wi-Fi hotspot
Bluetooth Yes, v4.0 with A2DP, LE
USB Yes, microUSB v2.0, USB Host
CAMERA Primary 5 MP, 2592?1944 pixels, autofocus, LED flash, check quality
Features Geo-tagging, touch focus, face detection, HDR, panorama
Video Yes, 720p@30fps, stereo sound rec., HDR, check quality
Secondary Yes, 1.3 MP
FEATURES OS Android OS, v4.3 (Jelly Bean), upgradable to v4.4.2 (KitKat)
Chipset Qualcomm Snapdragon 400
CPU Quad-core 1.2 GHz Cortex-A7
GPU Adreno 305
Sensors Accelerometer, proximity, compass
Messaging SMS(threaded view), MMS, Email, Push Email, IM
Browser HTML5
Radio FM radio
GPS Yes, with A-GPS support and GLONASS
Java Yes, via Java MIDP emulator
Colors Black (front panel), 7 color options (back panel)
– SNS integration
- Google Drive (50 GB storage)
- Active noise cancellation with dedicated mic
- MP3/AAC+/WAV/Flac player
- MP4/H.263/H.264 player
- Organizer
- Photo viewer/editor
- Document viewer
- Google Search, Maps, Gmail
- YouTube, Google Talk, Picasa
- Voice memo/dial
- Predictive text input
BATTERY
Non-removable Li-Ion 2070 mAh battery
Stand-by
Talk time
Up to 24 h
Software Updates
The Moto G became one of the first smartphones to get the Android 4.4 KitKat update. The update was rolled out over-the-air and requires at least 200MB of free storage on the device. The Android 4.4 update was rolled out worldwide by Motorola, as promised by them during the phone’s launch event.

Baca Selengkapnya ....

Motorola phones will offer fastest Android updates.

Posted by Unknown 0 komentar
Despite the likes of Samsung and HTC being considerably larger providers of Android powered handsets, Motorola could be set to get preferential treatment, with the American manufacturer to rely on its new Google ownership to offer earlier Android OS updates than rivals.
“If you’re going to buy an Android phone you’ll get the fastest Android updates on Motorola,” the company’s CEO said speaking exclusively with TrustedReviews.
Woodside revealed that he hopes early access to the latest Android updates will encourage consumers to return to Motorola-branded handsets following a number of years out in the dark.
“What do we want people to say about Motorola in 2-3 years?” Woodside questioned. “That we are constantly proving that software is key.”
He added: “We want them to say Motorola stands for quality and value. That I can’t get a better smartphone at that price-point and then in the higher price products it’s that I have more choice.”
An early sign of things to come, while the flagship, market leading Samsung Galaxy S4 and HTC One are still awaiting Android 4.4 KitKat updates, both the Motorola Moto G and Motorola Moto X have already been handed the latest Google OS.
Google confirmed the takeover of Motorola Mobility – the company’s mobile arm – back in 2011 for a fee of $12.5 billion.
Although the Motorola Moto X, the first post-takeover smartphone, launched in the US last August, the company is still struggling for serious market share.
Despite being set to prioritise Motorola handsets for early Android updates, Google has, as of yet, failed to hand the Nexus-branding to the company, with both the Google Nexus 4 and Google Nexus 5 smartphones manufactured in partnership with LG.

Baca Selengkapnya ....

How to increase ram of Android phone.

Posted by Unknown 0 komentar
NOw you can increase ram using :

ROEHSOFT RAM EXPANDER (SWAP)

This is the most powerful Release ever! Exclusive  in Play Store!(paid app)
Insufficient RAM, memory is too small? Use your SD card as a working memory expansion! A Memory Manager which make’s you life more easy as you think…
A great programmer once said to insufficient RAM -RAM only helps-. Convince yourself how right this man had.
Finally, more memory with a click! Memory from Android 1.6 up with root access and external SD card! More memory means that background tasks will never more automatically terminated, and many programs will work correctly in the first place!

TO DOWNLOAD ROEHSOFT RAM EXPANDER CLICK ON LINK GIVEN BELOW:

How to use this :
1.Install downloaded app.
2.Set size of ram you want to expand .
Image
3.select parition.
Image
ANd done enjoy with upto 4 gb virtual ram !!!!
For any problem leave comment and if you like so hit like
thankssss!!!!!!!

Baca Selengkapnya ....

How to Update Samsung Galaxy Y (GT-S5360) to Android 4.4 KitKat(working 100%)

Posted by Unknown 0 komentar


The update we are going to write about is not official update its makes your device look alike the latest Google Android 4.4 Kitkat. By installing this Rom you will lose your warranty. Follow the steps carefully this procedure is only meant to update Samsung Galaxy Y GT-S5360 to Android 4.4 KitKat and may not work on any other device. Don’t try to do on other devices this will make the devices not work causing them a hard brick which is hard to recover. Proceed with caution.
Prerequisites to Update Samsung Galaxy Y GT-S5360 to Android 4.4 KitKat:-
  1. Make sure your device Model is GT-S5360.
  2. Charge the device upto 80%.
  3. Make sure you have rooted the Device and Installed a custom recovery like ClockWorkMod on it. If your device is not rooted, have a look at How to Root Samsung Galaxy
  4. Enable USB Debugging on your device. During the process you will loss all the data present in your device. Kindly back up your device using the step-by-step tutorial.
  5. Download CWM RECOVERY, CM Kernel & Android 4.4 Kitkat rom.

Procedure to Update Samsung Galaxy Y GT-S5360 to Android 4.4 KitKat:-

  1. Copy all the files you have downloaded from above links to your SD Card.
  2. Now Turn off your mobile and switch it on using Volume up+power+Home button.
  3. The above combination takes you to a recovery screen.
  4. Now select update from SD Card and select CWM.
  5. Now you are in CWM recovery screen. Select Install from SD card.
  6. Select CyanogenMod.zip from the list after installing select reboot recovery.
  7. Now its time to format system, Cache & Dalvik Cache.
  8. After that select Install from sd card and Select Android 4.4 Kitkat rom.
  9. After installing the Rom do a factory reset from the recovery menu itself.

Baca Selengkapnya ....

How to use PostgreSQL Foreign Data Wrappers for external data management

Posted by Unknown Selasa, 14 Januari 2014 0 komentar
http://www.openlogic.com/wazi/bid/331001/how-to-use-postgresql-foreign-data-wrappers-for-external-data-management


Often times, huge web projects use multiple programming languages and even multiple databases. While relational database management systems (RDBMS) are common, they have limitations when it comes to the management of highly variable data. For such applications, NoSQL databases are a better alternative. The PostgreSQL RDBMS now provides Foreign Data Wrappers (FDW) that let PostgreSQL query non-relational external data sources.
FDWs are drivers that allow PostgreSQL database administrators to run queries and get data from external sources, including other SQL databases (Oracle, MySQL), NoSQL databases(MongoDB, Redis, CouchDB), text files in CSV and JSON formats, and content from Twitter. A few of the wrappers, such as the one for Kyoto Tycoon, allow PostgreSQL to handle both read and write operations on remote data.
FDWs are based on the SQL Management of External Data (SQL/MED) standard, which supports SQL interfaces to remote data sources and objects. They have been officially supported since PostgreSQL 9.1. You can see a full list of released FDWs on the PostgreSQL wiki.

Strengths and weaknesses of relational and NoSQL databases

Why might you want to use FDWs when most web applications use relation databases on the back end? RDBMSes have been around for decades and are perfectly suitable to storing data whose structure is known in advance. Relational databases allow developers to create complex queries on data from multiple tables. They are secure and flexible when it comes to retrieving structured data, and they keep data consistent.
But RDBMSes are not suitable for storing data with huge variations in record structures or many hierarchical sublevels. NoSQL database models offer more freedom in data structure, simpler management, fewer system requirements, high scalability on multiple servers, and fast performance. They allow the storage of multidimensional structures with huge amount of data. On the minus side, however, they do not always preserve data consistency.
SQL databases maintain the properties of atomicity, consistency, isolation, and durability (ACID), which makes them a natural choice for storing important data such as financial transactions and accounts. By contrast, NoSQL databases are typically used to store less important data, such as server logs, or variable data that cannot be easily described in a structure during the design stage.
FDWs are designed to preserve PostgreSQL security and utilize the numerous features of PostgreSQL databases while taking advantage of the performance and scalability of NoSQL databases.

How to connect PostgreSQL with MongoDB through an FDW

MongoDB, one popular NoSQL solution, is a document database that allows objects with different numbers of fields to be included in a database. Objects can also be nested in other objects, with no limit on the depth. Let's see how to use FDWs in PostgreSQL to access MongoDB data.
I'll assume you have installed and configured PostgreSQL on your server. You may have the latest stable release, PostgreSQL 9.3, installed, but the latest version of the MongoDB FDW (currently mongo_fdw 2.0.0), which is developed by a third-party company, is compatible only with PotsgreSQL 9.2. The temporary lack of compatibility with the latest stable PotsgreSQL release is one of the disadvantages of this approach. While we can expect a new release of the wrapper that is compatible with PostgreSQL 9.3, there is no current information when it will be ready.
You can install the PostgreSQL 9.2 RPM package for your architecture by running the following commands:
wget http://yum.postgresql.org/9.2/redhat/rhel-6-i386/pgdg-centos92-9.2-6.noarch.rpm
rpm -ivH pgdg-centos92-9.2-6.noarch.rpm
Then use the yum search postgres command to list all the available packages for your architecture, and install them with a command like yum install postgresql92-devel postgresql92-server postgresql92-contrib.
Initialize your PostgreSQL cluster and start the server:
service postgresql-9.2 initdb
Initializing database: [ OK ]
/etc/init.d/postgresql-9.2 start
Starting postgresql-9.2 service: [ OK ]
Once you have your PostgreSQL database server up and running, you can log in with the special postgres user, run the command-line interface for PostgreSQL, and create a test table with some sample data – in this case a list of shops and their addresses:
su postgres
bash-4.1$ psql
postgres=# CREATE TABLE shops(id serial primary key NOT NULL, name text NOT NULL, address char(50));
postgres=# INSERT INTO shops(name, address) VALUES ('My Hardware', 'USA, NY, 5th Avenue 33'), ('My Mobile Devices', 'UK, London, Fulham Road 22'), ('My Software', 'Germany, Berlin, Rosenthaler Street 3');
You can verify the data that you have entered through the SELECT query:
postgres=# select * from shops;
id | name | address
----+-------------------+----------------------------------------------------
1 | My Hardware | USA, NY, 5th Avenue 33
2 | My Mobile Devices | UK, London, Fulham Road 22
3 | My Software | Germany, Berlin, Rosenthaler Street 3
(3 rows)
In an application that uses this data you might want to collect the total income from all the different types of online shops. Getting the answer might be complicated by the fact that each shop might sell totally different products, and it might be difficult to define the tables' structures during the design stage.
Instead of trying to force the data to follow a relational structure, you can use a document database like MongoDB that better supports the storage of highly variable data.
Create the corresponding /etc/yum.repos.d/mongodb.repo file with the configuration details for the MongoDB repository as explained in the official installation instructions. Then use the yum install mongo-10gen mongo-10gen-server command to install the latest stable release of the MongoDB server and the included tools. Start the service by entering /etc/init.d/mongod start at the command prompt.
You can configure both PostgreSQL and MongoDB to auto-start after your system is rebooted by entering the commands chkconfig postgresql-9.2 on && chkconfig mongod on.
Start the MongoDB command shell by typing mongo followed by the database name:
mongo myshops
MongoDB shell version: 2.4.8
connecting to: myshops
Next, enter some sample objects in the MongoDB database:
db.orders.insert({
"shop_id" : 1,
"order_id" : 1,
"customer" : "Joe D.",
"products" : [
{ "product_id" : "SKU01", "type" : "CPU", "model" : "Intel Core i3 4340", "price" : 220 },
{ "product_id" : "SKU04", "type" : "CPU", "model" : "Intel Core i7 4770", "price" : 420 },
{ "product_id" : "SKU35", "type" : "laptop bag", "model" : "leather 1", "colour" : "black", "price" : 40 }
],
"delivery_address" : {
"country" : "USA",
"state" : "California",
"town" : "Yorba Linda",
"street_address" : "Main street 23",
"zip" : "92886",
"mobile_phone" : "101001010101"
}
})
db.orders.insert({
"shop_id" : 2,
"order_id" : 2,
"customer" : "Mike A.",
"products" : [
{ "product_id" : "SKU01", "type" : "smart phone", "model" : "Google Nexus", "price" : 400 },
{ "product_id" : "SKU05", "type" : "tablet", "model" : "iPad Air", "memory" : "16GB", "price" : 420 }
],
"delivery_address" : {
"country" : "Belgium",
"town" : "Brussels",
"street_address" : "1st street 2",
"zip" : "1234",
"mobile_phone" : "1010010143"
}
})
db.orders.insert({
"shop_id" : 2,
"order_id" : 3,
"customer" : "Mike A.",
"products" : [
{ "product_id" : "SKU04", "type" : "smart phone", "model" : "HTC Hero", "condition" : "used", "price" : 20 },
{ "product_id" : "SKU05", "type" : "tablet", "model" : "iPad Air", "memory" : "16GB", "promotion" : "Christmas 20% off", "price" : 336 }
],
"delivery_address" : {
"country" : "UK",
"town" : "London",
"street_address" : "2nd street 22",
"zip" : "9999",
"mobile_phone" : "41010010143"
}
})
db.orders.insert({
"shop_id" : 3,
"order_id" : 4,
"customer" : "John C.",
"products" : [
{ "product_id" : "SKU335", "type" : "book", "title" : "Learn PostgreSQL", "price" : 30 }
],
"delivery_address" : {
"country" : "Germany",
"town" : "Koln",
"PO_box" : "223"
}
})
You can use the built-in MongoDB aggregation functionality to get the total sum for every order and store it in a separate data collection:
var total = db.orders.aggregate( [
{ $unwind: "$products" },
{ $group: {
_id: '$_id',
shop_id : { $first : "$shop_id" },
order_id : { $first : "$order_id" },
customer : { $first : "$customer" },
sum: { $sum: '$products.price' }
} }
] );
db.total.insert(total.result);
To see the result:
db.total.find().pretty().sort( { order_id: 1 } )
{
"_id" : ObjectId("52c47761ab2d51cfcc878609"),
"shop_id" : 1,
"order_id" : 1,
"customer" : "Joe D.",
"sum" : 680
}
{
"_id" : ObjectId("52c47761ab2d51cfcc87860a"),
"shop_id" : 2,
"order_id" : 2,
"customer" : "Mike A.",
"sum" : 820
}
{
"_id" : ObjectId("52c47761ab2d51cfcc87860b"),
"shop_id" : 2,
"order_id" : 3,
"customer" : "Mike A.",
"sum" : 356
}
{
"_id" : ObjectId("52c47762ab2d51cfcc87860c"),
"shop_id" : 3,
"order_id" : 4,
"customer" : "John C.",
"sum" : 30
}
Once you have sample data stored in your PostgreSQL and MongoDB databases you are ready to bind the two through the FDW.
First, use git to get the latest version of the FDW from the repository, then build and install the wrapper:
cd /usr/src/
git clone https://github.com/citusdata/mongo_fdw
cd /usr/src/mongo_fdw/
PATH=/usr/pgsql-9.2/bin/:$PATH make
PATH=/usr/pgsql-9.2/bin/:$PATH make install
Next, load the extension from the PostgreSQL command-line interface. Verify it and create a server instance for the wrapper:
postgres=# CREATE EXTENSION mongo_fdw;
CREATE EXTENSION
postgres=# \dx mongo_fdw;
List of installed extensions
Name | Version | Schema | Description
-----------+---------+--------+-----------------------------------------
mongo_fdw | 1.0 | public | foreign data wrapper for MongoDB access
(1 row)
postgres=# CREATE SERVER mongo_server FOREIGN DATA WRAPPER mongo_fdw OPTIONS (address '127.0.0.1', port '27017');
CREATE SERVER
Then set up a foreign table:
CREATE FOREIGN TABLE shops_sales
(
shop_id INTEGER,
order_id INTEGER,
customer TEXT,
sum INTEGER
)
SERVER mongo_server
OPTIONS (database 'myshops', collection 'total');
Now you are ready to run SQL queries on the data stored in the MongoDB database. For example, you can list all the records from the table, and then run another query to find the total income for each shop and sort the result based on the shop ID.
SELECT * FROM shops_sales;
shop_id | order_id | customer | sum
---------+----------+----------+-----
3 | 4 | John C. | 30
2 | 2 | Mike A. | 820
1 | 1 | Joe D. | 680
2 | 3 | Mike A. | 356
(4 rows)

SELECT shops.id AS "shop ID", shops.name AS "shop name", SUM(shops_sales.sum) AS "income" FROM shops INNER JOIN shops_sales ON shops.id = shops_sales.shop_id GROUP BY shops.id ORDER BY shops.id;
shop ID | shop name | income
---------+-------------------+--------
1 | My Hardware | 680
2 | My Mobile Devices | 1176
3 | My Software | 30
(3 rows)

FDW future

Most of the currently available FDWs support only reading from the remote data sources. Since the release of PostgreSQL 9.3, developers can create FDWs to also perform inserts, updates, and deletes on foreign data. Whether any particular FDW supports these operations depends on the developers of the corresponding wrapper.
FDWs work as mediators between PostgreSQL databases and external data sources in different formats. You can run SQL queries on every possible source of information as long as the wrapper knows how to convert the external data to PostgreSQL format. FDWs give PostgreSQL application developers a useful tool to extract data from diverse technologies and use a single, unified way to query it.

Baca Selengkapnya ....

Manage Your Configs with vcsh

Posted by Unknown Kamis, 02 Januari 2014 0 komentar
http://www.linuxjournal.com/content/manage-your-configs-vcsh

If you're anything like me (and don't you want to be?), you probably have more than one Linux or UNIX machine that you use on a regular basis. Perhaps you've got a laptop and a desktop. Or, maybe you've got a few servers on which you have shell accounts. Managing the configuration files for applications like mutt, Irssi and others isn't hard, but the administrative overhead just gets tedious, particularly when moving from one machine to another or setting up a new machine.
Some time ago, I started using Dropbox to manage and synchronize my configuration files. What I'd done was create several folders in Dropbox, and then when I'd set up a new machine, I'd install Dropbox, sync those folders and create symlinks from the configs in those directories to the desired configuration file in my home directory. As an example, I'd have a directory called Dropbox/conf/mutt, with my .muttrc file inside that directory. Then, I'd create a symlink like ~/.muttrc -> Dropbox/conf/mutt/.muttrc. This worked, but it quickly got out of hand and became a major pain in the neck to maintain. Not only did I have to get Dropbox working on Linux, including my command-line-only server machines, but I also had to ensure that I made a bunch of symlinks in just the right places to make everything work. The last straw was when I got a little ARM-powered Linux machine and wanted to get my configurations on it, and realized that there's no ARM binary for the Dropbox sync dæmon. There had to be another way.

...and There Was Another Way

It turns out I'm not the only one who's struggled with this. vcsh developer Richard Hartmann also had this particular itch, except he came up with a way to scratch it: vcsh. vcsh is a script that wraps both git and mr into an easy-to-use tool for configuration file management.
So, by now, I bet you're asking, "Why are you using git for this? That sounds way too complicated." I thought something similar myself, until I actually started using it and digging in. Using vcsh has several advantages, once you get your head around the workflow. The first and major advantage to using vcsh is that all you really need is git, bash and mr—all of which are readily available (or can be built relatively easily)—so there's no proprietary dæmons or services required. Another advantage of using vcsh is that it leverages git's workflow. If you're used to checking in files with git, you'll feel right at home with vcsh. Also, because git is powering the whole system, you get the benefit of having your configuration files under version control, so if you accidentally make an edit to a file that breaks something, it's very easy to roll back using standard git commands.

Let's Get Started!

I'm going to assume you're on Ubuntu 12.04 LTS or higher for this, because it makes installation easy. A simple sudo apt-get install vcsh mr git will install vcsh and its dependencies. If you're on another Linux distro, or some other UNIX derivative, you may need to check out vcsh and mr, and then build git if it's not packaged. I'm also going to assume you've got a working git server installed on another machine, because vcsh really shines for helping keep your configs synchronized between machines.
Once you've installed vcsh and its dependencies, it's time to start using vcsh. Let's take a fairly common config file that most everyone who's ever used a terminal has—the config file for vim. This file lives in your home directory, and it's called .vimrc. If you've used vim at all before, this file will be here. I'm going to show you how to get it checked into a git repository that is under vcsh's control.
First, run the following command to initialize vcsh's git repository for vim:

bill@test:~$ vcsh init vim
vcsh: info: attempting to create '/home/bill/.config/vcsh/repo.d'
vcsh: info: attempting to create '/home/bill/.gitignore.d'
Initialized empty Git repository in
↪/home/bill/.config/vcsh/repo.d/vim.git/
I like to think of the "fake git repos" that vcsh works with to be almost like chroots (if you're familiar with that concept), as it makes things easier to work with. You're going to "enter a chroot", in a way, by telling vcsh you want to work inside the fake git repo for vim. This is done with this command:

bill@test:~$ vcsh enter vim
Now, you're going to add the file .vimrc to the repository you created above by running the command:

bill@test:~$ git add .vimrc
You're using normal git here, but inside the environment managed by vcsh. This is a design feature of vcsh to make it function very similarly to git.
Now that your file's being tracked by the git repository inside vcsh, let's commit it by running the following git-like command:

bill@test:~$ git commit -m 'Initial Commit'
master (root-commit) bc84953 Initial Commit
Committer: Bill Childers bill@test.home
1 file changed, 2 insertions(+)
create mode 100644 .vimrc
Now for the really cool part. Just like standard git, you can push your files to a remote repository. This lets you make them available to other machines with one command. Let's do that now. First, you'll add the remote server. (I assume you already have a server set up and have the proper accounts configured. You'll also need a bare git repo on that server.) For example:

bill@test:~$ git remote add origin git@gitserver:vim.git
Next, push your files to that remote server:

bill@test:~$ git push -u origin master
Counting objects: 3, done.
Compressing objects: 100% (2/2), done.
Writing objects: 100% (3/3), 272 bytes, done.
Total 3 (delta 0), reused 0 (delta 0)
To git@gitserver:vim.git
* new branch master -> master
Branch master set up to track remote branch master from origin.
bill@test:~$ exit
Note the exit line at the end. This exits the "vcsh fake git repo". Now your .vimrc file is checked in and copied to a remote server! If there are other programs for which you'd like to check in configurations, like mutt, you simply can create a new repo by running vcsh init mutt, and then run through the process all over again, but this time, check your files into the mutt repository.

Move Your Configuration to Another Machine

To sync your configuration to another machine, you just need to install vcsh, git and mr, and then run a similar process as the steps above, except you'll do a git pull from your server, rather than a push. This is because you don't have the .vimrc file you want locally, and you want to get it from your remote git repository.
The commands to do this are:

bill@test2:~$ sudo apt-get install vcsh git mr
bill@test2:~$ vcsh enter vim
bill@test2:~$ git remote add origin git@gitserver:vim.git
bill@test2:~$ git pull -u origin master
From gitserver:vim
* branch master -> FETCH_HEAD
bill@test2:~$ exit
Now you've got your checked-in .vimrc file on your second host! This process works, but it's a little clunky, and it can become unwieldy when you start spawning multiple repositories. Luckily, there's a tool for this, and it's called mr.

Wrapping It All Up with mr

If you plan on using multiple repositories with vcsh (and you should—I'm tracking 13 repositories at the moment), getting a configuration set up for mr is essential. What mr brings to the table is a way to manage all the repositories you're tracking with vcsh. It allows you to enable and disable repositories simply by adjusting one symlink per repository, and it also gives you the ability to update all your repos simply by running one easy command: mr up.
Perhaps the best way to get started using mr is to clone the repo that the vcsh author provides. This is done with the following command:

bill@test2:~$ vcsh clone
↪git://github.com/RichiH/vcsh_mr_template.git mr
Initialized empty Git repository in
↪/home/bill/.config/vcsh/repo.d/mr.git/
remote: Counting objects: 19, done.
remote: Compressing objects: 100% (14/14), done.
remote: Total 19 (delta 1), reused 15 (delta 0)
Unpacking objects: 100% (19/19), done.
From git://github.com/RichiH/vcsh_mr_template
* new branch master -> origin/master 
Now that you've got your mr repo cloned, you'll want to go in and edit the files to point to your setup. The control files for mr live in ~/.config/mr/available.d, so go to that directory:
bill@test2:~/.config/mr/available.d$ ls mr.vcsh zsh.vcsh Rename the zsh.vcsh file to vim.vcsh, because you're working with vim, and change the repository path to point to your server:
bill@test2:~/.config/mr/available.d$ mv zsh.vcsh vim.vcsh bill@test2:~/.config/mr/available.d$ vi vim.vcsh [$HOME/.config/vcsh/repo.d/vim.git] checkout = vcsh clone git@gitserver:vim.git vim Also, edit the mr.vcsh file to point to your server as well:
bill@test2:~/.config/mr/available.d$ vi mr.vcsh [$HOME/.config/vcsh/repo.d/mr.git] checkout = vcsh clone git@gitserver:mr.git mr The mr tool relies on symlinks from the available.d directory to the config.d directory (much like Ubuntu's Apache configuration, if you're familiar with that). This is how mr determines which repositories to sync. Since you've created a vim repo, make a symlink to tell mr to sync the vim repo:
bill@test2:~/.config/mr/available.d$ cd ../config.d bill@test2:~/.config/mr/config.d$ ls -l total 0 lrwxrwxrwx 1 bill bill 22 Jun 11 18:14 mr.vcsh -> ↪../available.d/mr.vcsh bill@test2:~/.config/mr/config.d$ ln -s ↪../available.d/vim.vcsh vim.vcsh bill@test2:~/.config/mr/config.d$ ls -l total 0 lrwxrwxrwx 1 bill bill 22 Jun 11 18:14 mr.vcsh -> ↪../available.d/mr.vcsh lrwxrwxrwx 1 bill bill 23 Jun 11 20:51 vim.vcsh -> ↪../available.d/vim.vcsh Now, set up mr to be able to sync to your git server:
bill@test2:~/.config/mr/config.d$ cd ../.. bill@test2:~/.config$ vcsh enter mr bill@test2:~/.config$ ls mr vcsh bill@test2:~/.config$ git add mr bill@test2:\~/.config$ git commit -m 'Initial Commit' [master fa4eb18] Initial Commit Committer: Bill Childers [bill@test2.home] 3 files changed, 4 insertions(+), 1 deletion(-) create mode 100644 .config/mr/available.d/vim.vcsh create mode 120000 .config/mr/config.d/vim.vcsh bill@test2:\~/.config$ git remote add origin git@gitserver:mr.git fatal: remote origin already exists. Oh no! Why does the remote origin exist already? It's because you cloned the repo from the author's repository. Remove it, then create your own:
bill@test2:~/.config$ git remote show origin bill@test2:~/.config$ git remote rm origin bill@test2:~/.config$ git remote add origin git@gitserver:mr.git bill@test2:~/.config$ git push -u origin master Counting objects: 28, done. Compressing objects: 100% (21/21), done. Writing objects: 100% (28/28), 2.16 KiB, done. Total 28 (delta 2), reused 0 (delta 0) To git@gitserver:mr.git * [new branch] master -> master Branch master set up to track remote branch master from origin. bill@test2:~/.config$ exit That's it! However, now that mr is in the mix, all you need to do to set up a new machine is do a vcsh clone git@gitserver:mr.git mr to clone your mr repository, then do an mr up, and that machine will have all your repos automatically.

Conclusion

vcsh is a very powerful shell tool, and one that takes some time to adapt your thought processes to. However, once you do it, it makes setting up a new machine (or account on a machine) a snap, and it also gives you a way to keep things in sync easily. It's saved me a lot of time in the past few months, and it's allowed me to recover quickly from a bad configuration change I've made. Check it out for yourself!

Setting up a Remote Git Repo

A quick note on setting up a remote git repo: you'll need to set up passwordless authentication using SSH keys (see Resources for more information). Once you have that going using a "git" user, you simply need to create a git repo as the git user. That's done easily enough, just run the command:
git@gitserver:~$ git init --bare vim.git Initialized empty Git repository in /home/git/vim.git/ Your bare repo will be ready for your vcsh client to check in stuff!

Resources

vcsh Home Page: http://github.com/RichiH/vcsh
mr Home Page: http://joeyh.name/code/mr
vcsh Background Slides: https://raw.github.com/RichiH/talks/slides/2012/fosdem/vcsh/fosdem-2012-vcsh-talk.pdf
How to Set Up Your Own Git Server: http://tumblr.intranation.com/post/766290565/how-set-up-your-own-private-git-server-linux
Set Up Passwordless SSH Key-Based Authentication: http://askubuntu.com/questions/46930/how-can-i-set-up-password-less-ssh-login
 

Baca Selengkapnya ....

How to set up BGP Looking Glass server on CentOS

Posted by Unknown 0 komentar
http://xmodulo.com/2013/12/bgp-looking-glass-server-centos.html

This tutorial will describe how to set up a BGP Looking Glass server on CentOS. For those of you new to the concept of BGP and Looking Glass, let's start with introduction. If you are familiar with BGP, skip it over.

What is Border Gateway Protocol (BGP)?

BGP is literally the routing backbone of the Internet. As we all know it, the Internet consists of millions of interconnected networks. In the telecom industry, these millions of individual networks are referred to as Autonomous Systems (ASs). Each AS is managed under a single administrative domain (e.g., one organization or an ISP), with its own unique AS number and IP address pools aka IP prefixes. The AS number can be private (i.e., not visible publicly), and so can be the IP address pools. For example, when multiple branch offices of one company interconnect, they can use a private AS number and IP prefix for each branch office. Networks that want to use a public AS number and publicly routable IP addresses have to apply for them at a Regional Internet Registry (RIR) like ARIN, APNIC, RIPE. The RIR assigns a unique AS number and IP prefix(es) to that network.
BGP is the industry standard inter-domain routing protocol used to interconnect different ASs. All IP prefixes known to one AS are shared with neighboring ASs, thus populating the BGP routing tables of their border routers. The Internet is formed by such interconnections between millions of public ASs through BGP. So stating here again, BGP is essentially the routing backbone of the Internet.

What is Looking Glass?

Looking Glass (LG) is a web-based tool that helps network operators analyze how traffic is routed to and from a particular AS. The BGP routing table of an AS depends on what other ASs it is connected with. To be more specific, the IP prefixes learnt from neighboring ASs will populate the local BGP routing table, which will be used by the local AS to make its routing decisions.
Now assume that for troubleshooting routing or network latency related issues, we want to run ping or traceroute from a remote AS. Naturally, we do not have access to their equipment so running the test from remote locations is not feasible. However, the admins of a remote AS could set up a Looking Glass server with web-based interface, which will allow any user to run specific commands like ping, traceroute, or access the remote AS's BGP routing information, without logging in to their routers. These tests provide useful insight during network troubleshooting, as the ping or traceroute probing can be conducted from another AS's networks.

Setting Up BGP Looking Glass on CentOS

Before we start, please make sure that SELinux and firewall are tuned to permit necessary services and ports like 23, 2601, 2605, 80.
First of all, dependencies are installed. Using the Reporforge repository is recommended.
[root@lg ~]# yum install wget perl-Net-Telnet perl-Net-Telnet-Cisco perl-XML-Parser httpd
The Looking Glass will be set up using LG1. Necessary software is downloaded and extracted. The directory where the site will be stored is also created.
[root@lg ~]# cd /root
[root@lg ~]# wget http://www.version6.net/lg/lg-1.9.tar.gz
[root@lg ~]# tar zxvf lg-1.9.tar.gz
[root@lg ~]# mkdir /var/www/html/lg
Now that all files have been extracted, they are copied into the web server directory. Necessary permissions are also set.
[root@lg ~]# cd /var/www/html/lg
[root@lg lg]# cp /root/lg-1.9/lg.cgi .
[root@lg lg]# cp /root/lg-1.9/favicon.ico .
[root@lg lg]# cp /root/lg-1.9/lg.conf .
All the files must be readable.
[root@lg lg]# chmod 644 *
The lg.cgi script must be executable.
[root@lg lg]# chmod 755 lg.cgi

Tuning the Web Server

The index.html file is created for LG with necessary redirection.
[root@lg ~]# vim /var/www/html/index.html
In case DNS is set up for the Looking Glass server:
1
2
3
4
5
<html>
<head>
<meta http-equiv="refresh" content="0;url=http://lg.example.tst/lg/lg.cgi">
</head>
</html>
Without DNS:
1
2
3
4
5
<html>
<head>
<meta http-equiv="refresh" content="0;url=http://IP/lg.cgi">
</head>
</html>
The following parameters are modified in the web server.
[root@lg ~]# vim /etc/httpd/conf/httpd.conf
## The favicon path and the cgi script paths are defined ##
Alias /lg/favicon.ico "/var/www/html/lg/favicon.ico"
ScriptAlias /lg "/var/www/html/lg/lg.cgi"
The httpd service is started and added to startup list.
[root@lg ~]# service httpd start
[root@lg ~]# chkconfig httpd on

Adding Routers to the Looking Glass

LG supports Cisco, Juniper and Linux Quagga routers. All routers are added to /var/www/html/lg/lg.conf. Please note that the router password required is the remote login password, and NOT the privileged EXEC password aka 'enable' password.
[root@lg ~]# vim /var/www/html/lg/lg.conf
1
2
3
4
5
6
7
8
9
10
11
12
13
<Separator>Sample Routers</Separator>
 
<Router Name="Router-A">
<Title>Router-A</Title>
<URL>telnet://login:routerPassword@routerIP</URL>
</Router>
 
<Router Name="Router-B">
<Title>Router-B</Title>
<URL>telnet://login:routerPassword@routerIP</URL>
</Router>
The Looking Glass is now ready with minimum configuration. It can be accessed by entering the http://IP, or http://lg.example.tst in a web browser.
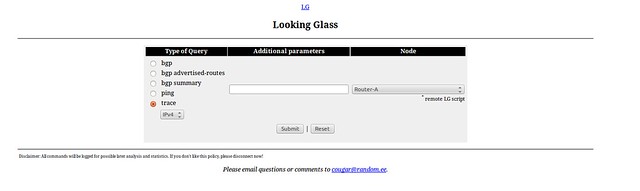
Here's a screenshot of the fresh Looking Glass.

Provisioning for IPv6

Preparing the Looking Glass for IPv6 is simple as well. The following lines are modified.
[root@lg ~]# vim /var/www/html/lg/lg.cgi
## $ipv4enabled-- is replaced with $ipv4enabled++ around line 398 ##
### Commented out $ipv4enabled-- ####
$ipv4enabled++
Then the routers that support IPv6 are specified.
[root@lg ~]# vim /var/www/html/lg/lg.conf
1
2
3
4
5
<Router Name="Router-A" EnableIPv6="Yes">
<Title>Router-A</Title>
<URL>telnet://login:routerPassword@routerIP</URL>
</Router>
Any reachable IPv4 or IPv6 address that can be used for logging in to the router can be specified here as the IP address.

Optional Configurations

The following configuration is optional. However, they can help in giving the LG a professional look.
1. Logo
The logo image is stored in /var/www/html/images.
[root@lg ~]# mkdir /var/www/html/images
[root@lg ~]# cp logo.png /var/www/html/images/logo.png
[root@lg ~]# vim /var/www/html/lg/lg.conf
1
<LogoImage Align="center" Link="http://www.companyweb.com/">/images/logo.png</LogoImage>
2. Page Headers
The headers of the page can modified as needed.
[root@lg ~]# vim /var/www/html/lg/lg.conf
1
2
<HTMLTitle>ASXXXX IPv4 and IPv6 Looking Glass</HTMLTitle>
<ContactMail>lg@example.tst</ContactMail>
[root@lg ~]# vim /var/www/html/lg/lg.cgi
1
2
3
4
5
6
7
8
9
10
11
#### In the closing section of the HTML tag i.e. </HTML>, the following line can be added####
<I>
  Please email questions or comments to
 <A HREF="mailto:$email">$email</A>.
</I>
<P>
<P>
Powered By: <a href="http://wiki.version6.net/LG">Looking Glass 1.9</a></P>
</CENTER>
</BODY>
</HTML>
3. Logging
Needless to say, logging is important. The log file can be created this way.
[root@lg ~]# touch /var/log/lg.log
[root@lg ~]# chown apache:apache /var/log/lg.log
[root@lg ~]# vim /var/www/html/lg/lg.conf
1
<LogFile>/var/log/lg.log</LogFile>
Now the Looking Glass is up, and ready to be used.

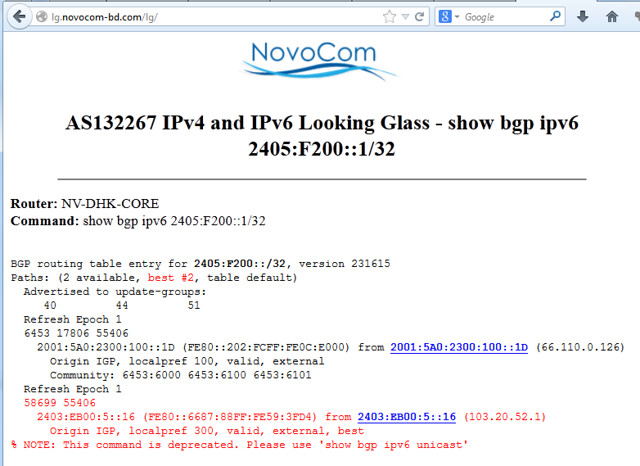
Looking Glass Screenshots

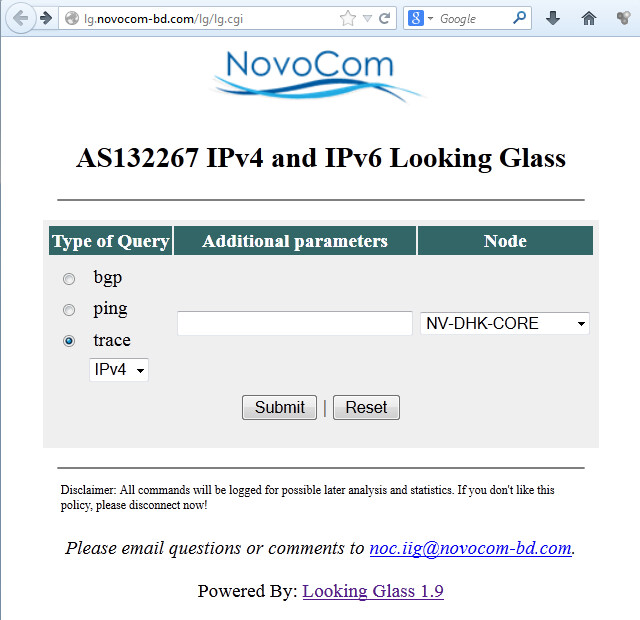
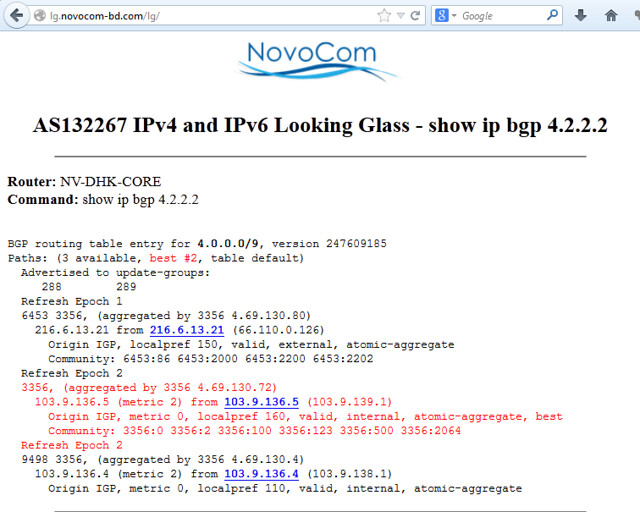
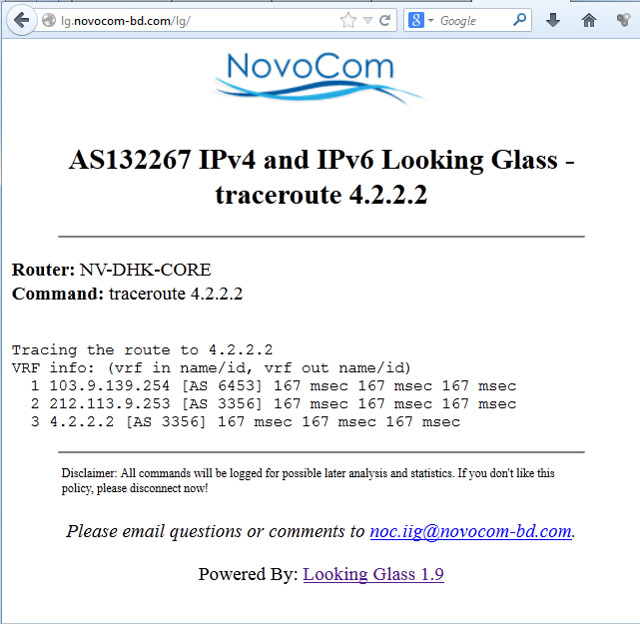
The following are some screenshots from the Looking Glass of AS 132267.
  • Live Looking Glass Interface

  • "show ip bgp" output

  • traceroute output

  • "show bgp ipv6" output

  • traceroute ipv6 output

  • Hope this helps.

    Baca Selengkapnya ....
    Trik SEO Terbaru support Online Shop Baju Wanita - Original design by Bamz | Copyright of android japan.